
This post opens a little window into my current thoughts about digital cinema, dynamic range, and some recent and ongoing testing of the RED One camera. I thought some of you might be interested in the process I go through when pondering things like this, rather than just some dry results.
Camera tests are a bit funny to me. You test a 3rd grader to give him a grade. You test the waters to see if you want to jump in. And you test house paint colors by pinning some swatches to the wall and trying to get a feel for what you like. I often feel that camera tests are more like that last example than anything else. But there is a kind of testing that makes a ton of sense—the testing you do when you've already 99% decided what camera you want to use, and now you want to figure out how you want to use it to produce a specific result. That's what writer/director Moses Ma did for his film The Ethical Slut. He and DP Paul Nordin knew they wanted to shoot with the RED One, so they staged a test based on a short scene from the film.
To make things interesting, the shot in an airy studio with big windows that they knew they couldn't control. And as you can see, those windows are overexposed, and clipped.
We all knew this was going to cause problems, but the exact nature of these problems has got me thinking about some of my favorite digital cinema questions: What exactly is dynamic range? And what constitutes a film-like image?
And of course a very concrete question: What should we do the next time we're shooting RED and there's a window in the room?
To help with my head-scratching about all this, I turned to After Effects, as I tend to do. I created a virtual scene with common exposure targets in HDR. Here's what it looks like:
And here are the targets annotated:
The gray card is your standard 18% reflectance, and it like all the cards in the scene are rendered without any shading so that they return pure values. The image, being a gamma 1.0 HDR, contains floating-point values that map 1:1 with the diffuse reflectance of the subjects, so the 18% gray card maps to pixel values of 0.18.
The black card is not pure black, but rather a more physically realistic 1% reflectance.
The pure white card is a bit of a hypothetical (nothing reflects 100% of the light that hits it), but it and the either cards are more about exposure targets than simulating a physical object. So we have spots in the frame that represent "white" and one, two, three and four stops over "white." We also have something that doesn't really exist in nature: pure black.
The "skin tones" in the scene are designed so that they both land on the "skin vector" of a vectorscope and rate as 70% luminance in Rec709. So between the skin target and the 18% gray card this scene is designed to be easy-as-pie to expose according to traditional rules-of-thumb.
Video rules of thumb, that is.
Here's the same scene underexposed by four stops so that you can see the relationships of all the exposure targets. This also makes it clear that each card has a patch of "detail" to help distinguish whether the truly falls within exposure.
All these images have been converted to sRGB space for viewing on your gamma 2.2 display of course. If you'd like to download the scene as a 16-bit float EXR, you can do so here.
So now we have our hypothetical scene, it's time to shoot it with a hypothetical camera. A Rec709 camera uses an encoding curve of roughly gamma 1.9, but its images are designed to be displayed at gamma 2.2, which is very close to sRGB, the viewing assumption for all images on this page.
So let's take a look at what happens when we shoot our scene with a Rec709 camera. Following one of many rules-of-thumb on the subject, we'll expose the gray card at 45% luminance and skin tones at 70%. Here are the results:
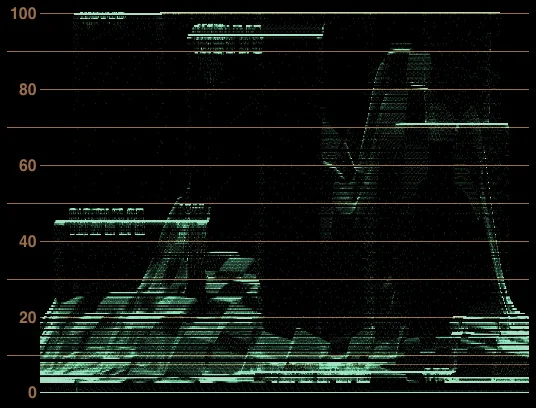
The same shot on a Waveform Monitor:

As you can see, the gray card is at 45% IRE and the skin tones are at 70%. But you can also see that the other cards are all pegged to the ceiling—even the 100% card. Exposing a pure Rec709 image using the common standards doesn't even leave you enough headroom for something "white."
If I expose the scene down by half a stop you can see the white card come into range in both the image and the scope:

So this is what happened on our RED shoot. We exposed according to video rules using the only image our RED One was capable of displaying, and we wound up with very little room for highlights.
You might ask what the big deal is here. "Sure, the windows (or cards) are blown out, but that's the picture we're making! The windows are bright and I want them to look white." That would be a perfectly reasonable position to take—unless you planned on transferring to film.
See, color negative film has a huge shoulder, the part of the famous s-curve at the top where it slopes gently off. "White" is nowhere near overexposed on film—it's right at the beginning of this shoulder, right after the straightline portion of the curve.
Watch what happens when I take my Rec709 image and convert it to Cineon Log using a gamma of 2.2:
Here I used the default settings of 10-bit black = 95, white = 685. As you can see, the white card and all its overexposed companions are maxed out at 685, nowhere near the maximum 10-bit value of 1023.
Here's what that image would look like printed to Kodak 2383 print film:
And now you see the problem. The clipped highlights map not to white, but to a pinkish gray that's about 80% of the available brightness.
You might suggest to change the white-point mappings so that those clipped whites get placed closer to 1023, but in doing so you brighten up the entire scene:
...but now our carefully metered gray card and person are way overexposed.
And this is exactly what happened with our test footage. We converted it to log using Red Alert and graded in under a 2383 preview LUT, and the windows appeared as pink, flat fields rather than sunny, overexposed sunlight:
Now the truth is, most Rec709 cameras save a little room above pure signal white for overexposure, and RED One is no exception. Using Red Alert I was able to extract a bit more out of those windows—but just a bit.
What traditional video cameras tend to do with that headroom is build a little rolloff into the Rec709 curve. Like a tiny version of film's mighty shoulder, this rolloff allows a more graceful clip into white whil still keeping things like gray cards on their waveform targets. Here's a hypothetical Rec709 image with a bit of a rolloff:
As you can see, gray is still at 45%, but now "white" maps to about 94%, and even the one-stop-over card is not fully blown out. This more closely approximates the behavior of most HD video cameras, and it would seem to be a good thing. What a clever person can do when transfering this kind of video to film is undo that shoulder curve and pull that extra bit of highlight latitude back up into the brighter Cineon registers without affecting the midtones, resulting in less flattened whites and as-expected mids.
But this concept, while critical for transferring old-school video to film, has nothing to do with RED, or any camera that shoots raw. Because how that rolloff works inside the camera is by underexposing, and then creating a linear image that is then bent into this funky bastardization of the Rec709 curve. So the camera that made the rolloff image above would first capture this image internally:
(note that the image has been converted to Rec709 for viewing)
...and then pushes up the mids to create this:
This is important when your camera records compressed, limited-bit-depth images. On Red it wouldn't help at all, because the gamma curve is merely a preview. But that doesn't mean we can't learn from the process.
The camera gave itself extra room for highlights by under exposing. A 1 1/4 stop underexposure gave the camera enough highlight latitude to create a nice soft shoulder.
And so we come to the conclusion that was, of course, blatantly obvious at the beginning: To get more highlight latitude, we'll need to underexpose. Obvious indeed, but what's maybe not so obvious is that without the rolloff tricks that we're accustomed to from our video cameras to fall back on, we can really screw ourselves by failing to underexpose RED One.
But how much should we underexpose? For one suggestion of how much, let's look at another digital cinema camera, the Panavision Genesis. The Genesis shoots to a color space known as "Panalog." Rather than using a gamma curve, it uses a logarithmic curve similar enough to the Cineon log curve that one can actually recreate the Panalog transfer function using a standard Cineon lin/log tool.
Here is our scene in Panalog, exposed per Panvasion's guidelines:

Note that while we still get to give our gray card a decent exposure, it's not up at 45%. And we have no trouble holding onto detail in the two-stops-over card. Lo and behold, this Panalog image transfers to film very nicely indeed:
(boosted 2 stops in printer lights)
Nothing magical here, although I do think there is real brilliance behind the Panalog format, since it can both be legible on a video display and transfer to film elegantly. But all that's happening is that the Genesis is recording a linear image on its chip that spans scene values from 0% to 600%. The log encoding is only mandated by the bit-depth of the recording medium. Armed with that knowledge, we can create a Rec709 version of the 0.0–6.0 linear image that the Genesis records:

And here we have the key. If we want the RED One to match the Genesis's latitude, this must be our exposure target in Rec709 (which, at the time of this writing, is the only monitoring option for the RED One, although that should change soon). We must ignore RED One's suggestions to expose it like a video camera.
Put 18% gray at 12.8% IRE.
Put white folk at 23.1% IRE.
"White" will land at 39.2% IRE, and you'll hold values all the way up to (and slightly beyond) 600%.
No problem. Except for two things:
This dark image won't be any fun to look at. Not for directors and not for DPs. Something more like Panalog would be better, and something to which a 3D LUT could be applied would be ideal.
But more importantly, RED One, like many cameras, has compression and noise, two things that show up like crazy in underexposed images. By standardizing on an underexposed image, we are putting the most important value ranges down in the mud where they just might get stepped on.
But hey, that's what Panavision's doing! They just happened to plan their entire camera and imaging pipeline around what they perceived as a digital cinema mandate: hold onto enough highlight values that your images look terrific on film.
So how will the RED One handle being underexposed by 2.580 stops across the board? We'll find out next week when Paul shoots his next round of tests!
Oh, and one last thing, just to bring this all home. We've seen how a Rec709 camera can't even hold 100% scene illumination without some underexposure, usually found in the form of a rolloff curve that allows it to capture maybe up to about 150%. We've seen how the Genesis cleverly holds onto 600% scene illumination. But what of film? Well, there are a lot of different film stocks out there, but as a rule the Cineon log model, which makes no accounting for toe or shoulder, maps Cineon log 1023 to 1,352%.
That's right, 1,352%. Here's what that looks like:
Only the 4-stops-over patch is clipped, and just barely (and it wouldn't be if the shoulder was modeled). Shoot that out to film and you get this:
A full range of exposure, rich skin tones, and subtle detail in bright highlights.
Just a little reminder of what we're all shooting for here.