Visual Effects

Log is the “Pro” in iPhone 15 Pro

And I’ve got some free LUTs for you.

The iPhone 15 Pro and Pro Max feature log video recording. This is a big deal, but there’s already some confusion about it. Where consumer devices and pro video overlap, that’s where the Prolost Signal gleams brightest in the night sky. So let’s get to work.

First, what exactly is log? It’s short for logarithmic encoding, which is a math thing, but what does it mean to videographers?

It really boils down to two things: Log is flat, and log is known.

Flat is Good, and Log is the Best Flat

Standard iPhone video is designed to look good. A very specific kind of good that comes from lots of contrast, punchy, saturated colors, and ample detail in both highlights and shadows.

Log video looks flat. All the dynamic range and detail are there, but gone is that candy-coated punch. To make log footage look right, you have to color manage it in some way, often with a Look-Up Table, or “LUT.”

A LUT is just a color adjustment baked into a single file. Some LUTs add creative looks, others are more utilitarian, converting images from one color space to another — like from log to video.

If all we’re going to do with log footage is apply a LUT to make it look normal, what’s the big deal? Why add this extra step?

The power log gives us lies within that extra step, because:

  1. You pick the LUT! So log footage can look however you want. Sure, you can apply LUTs or color grading to regular iPhone footage, but the problem is it already has its own very punchy look baked in. With log you can pick the look that works for you, and even more importantly...
  2. You can color grade under the LUT. So you can adjust the color of the footage in a natural and organic way.
  3. And this workflow matches what you’re doing with your digital cinema camera already, so you can color-manage this footage right into a timeline with your Canon, Sony, Arri, or whatever else you’ve got.

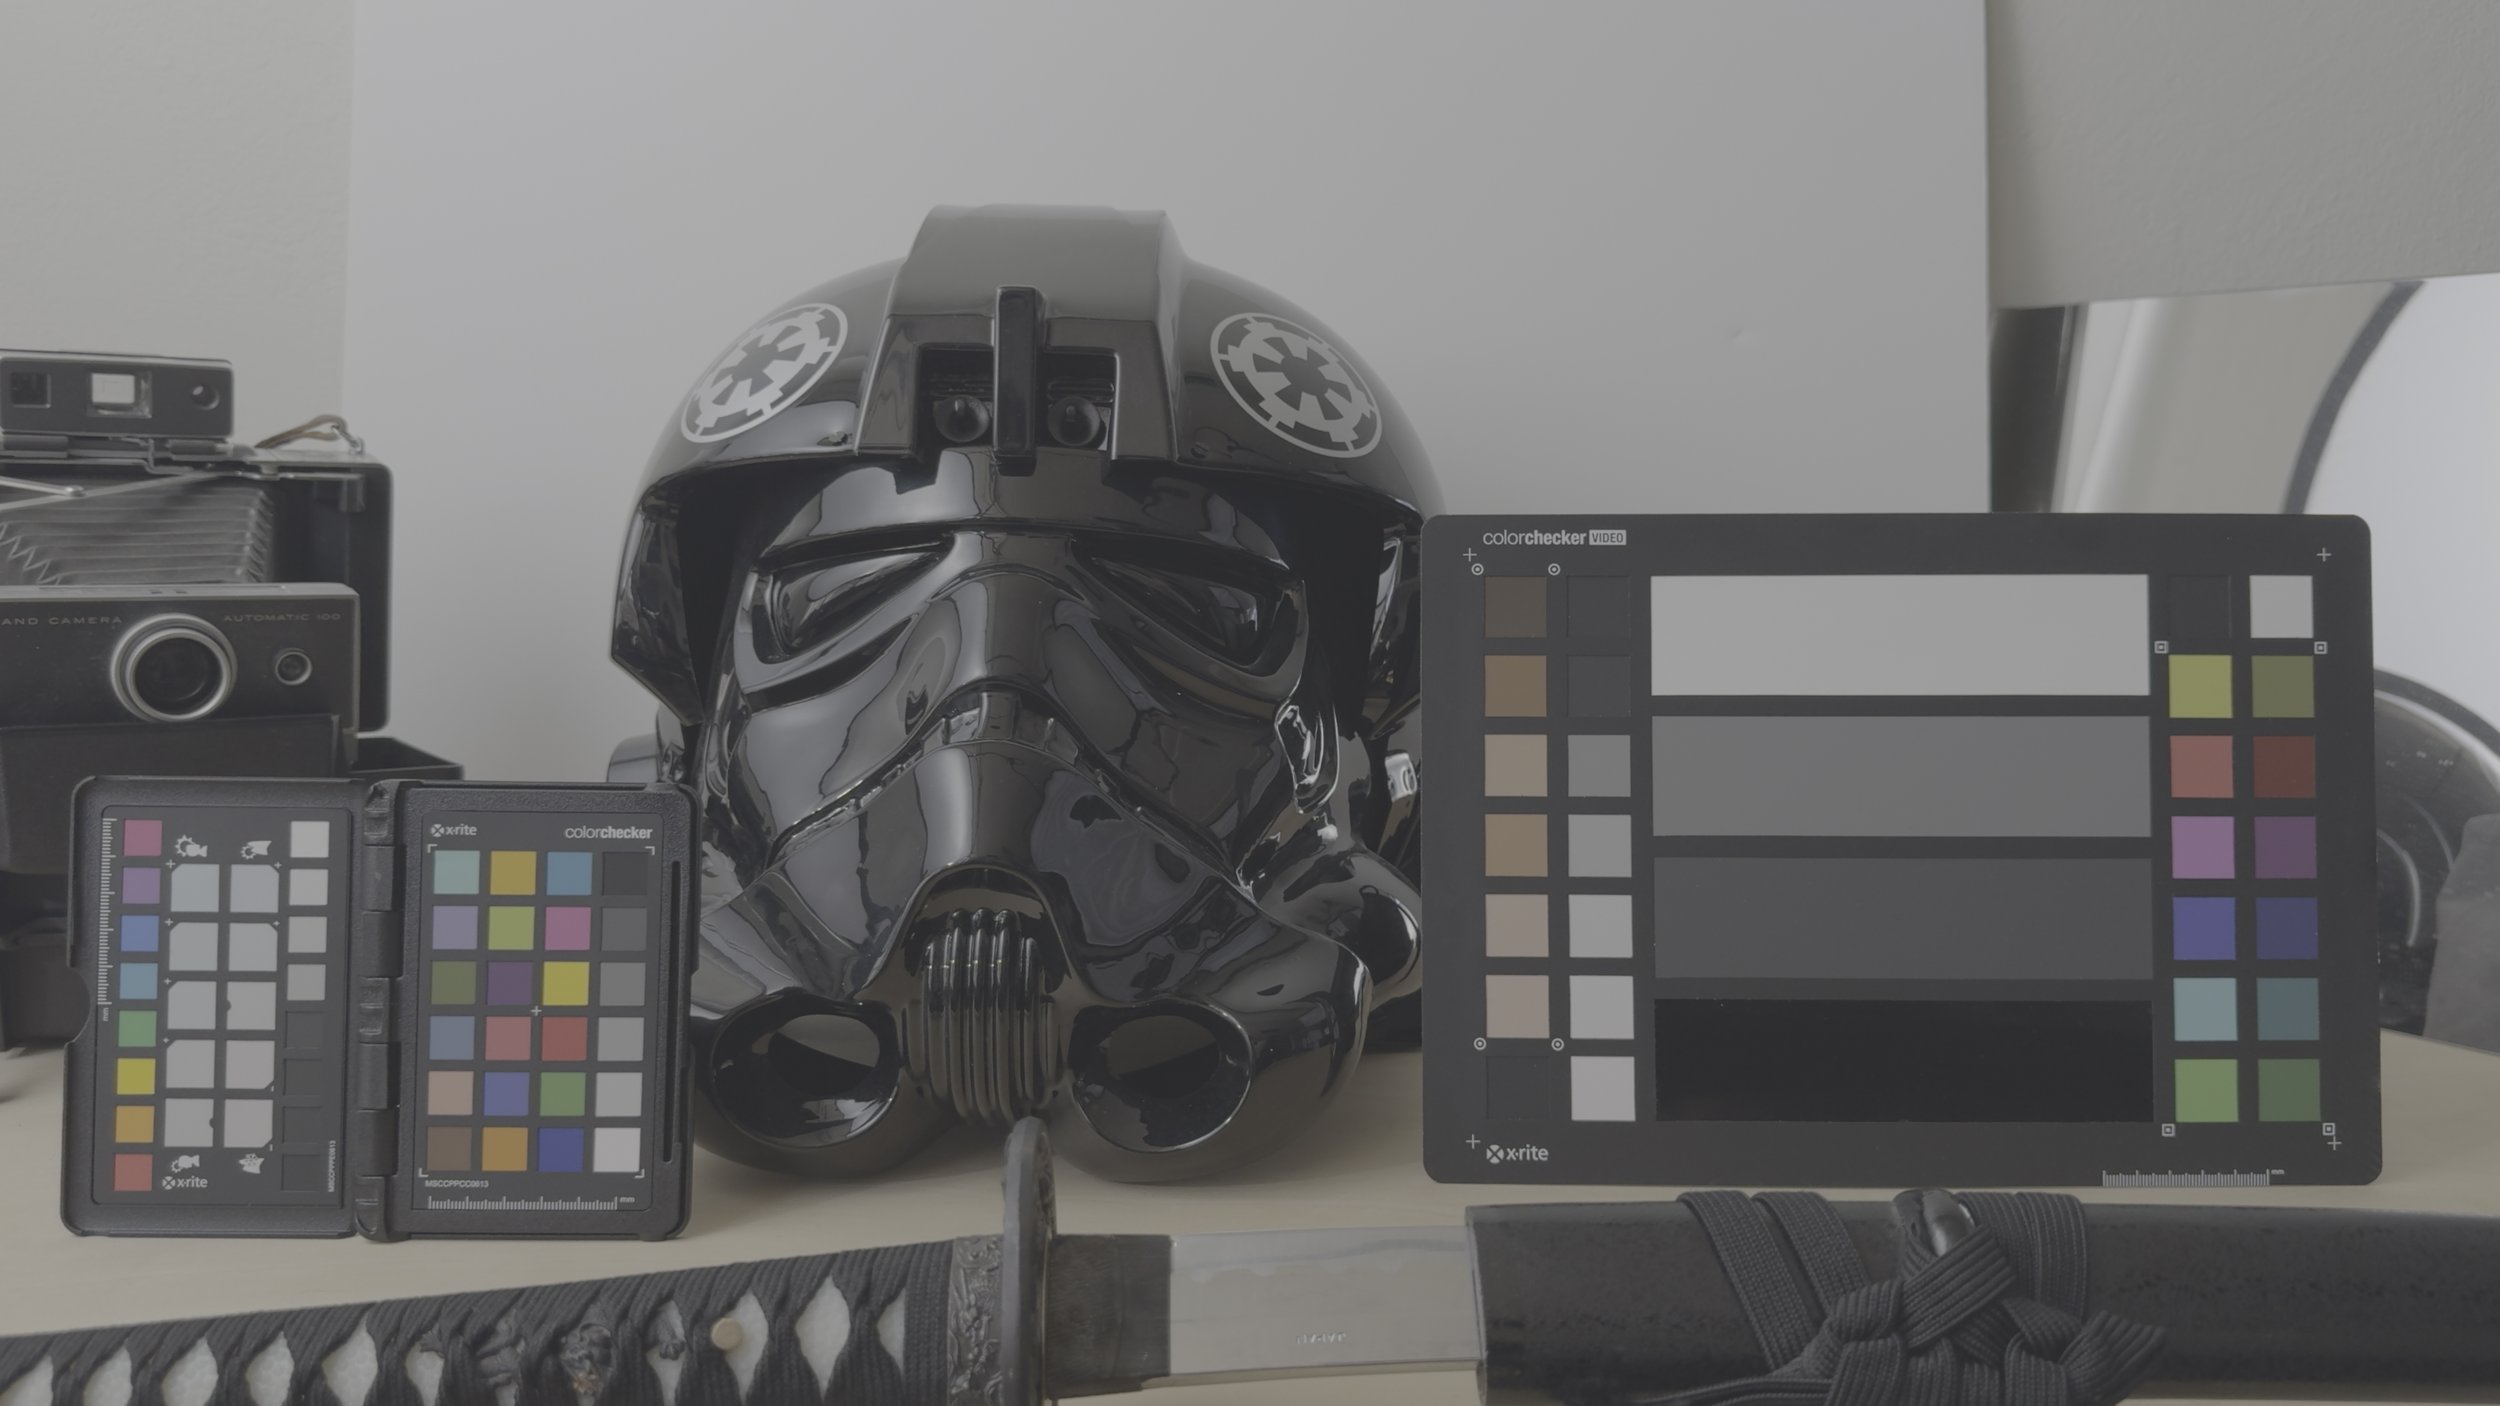
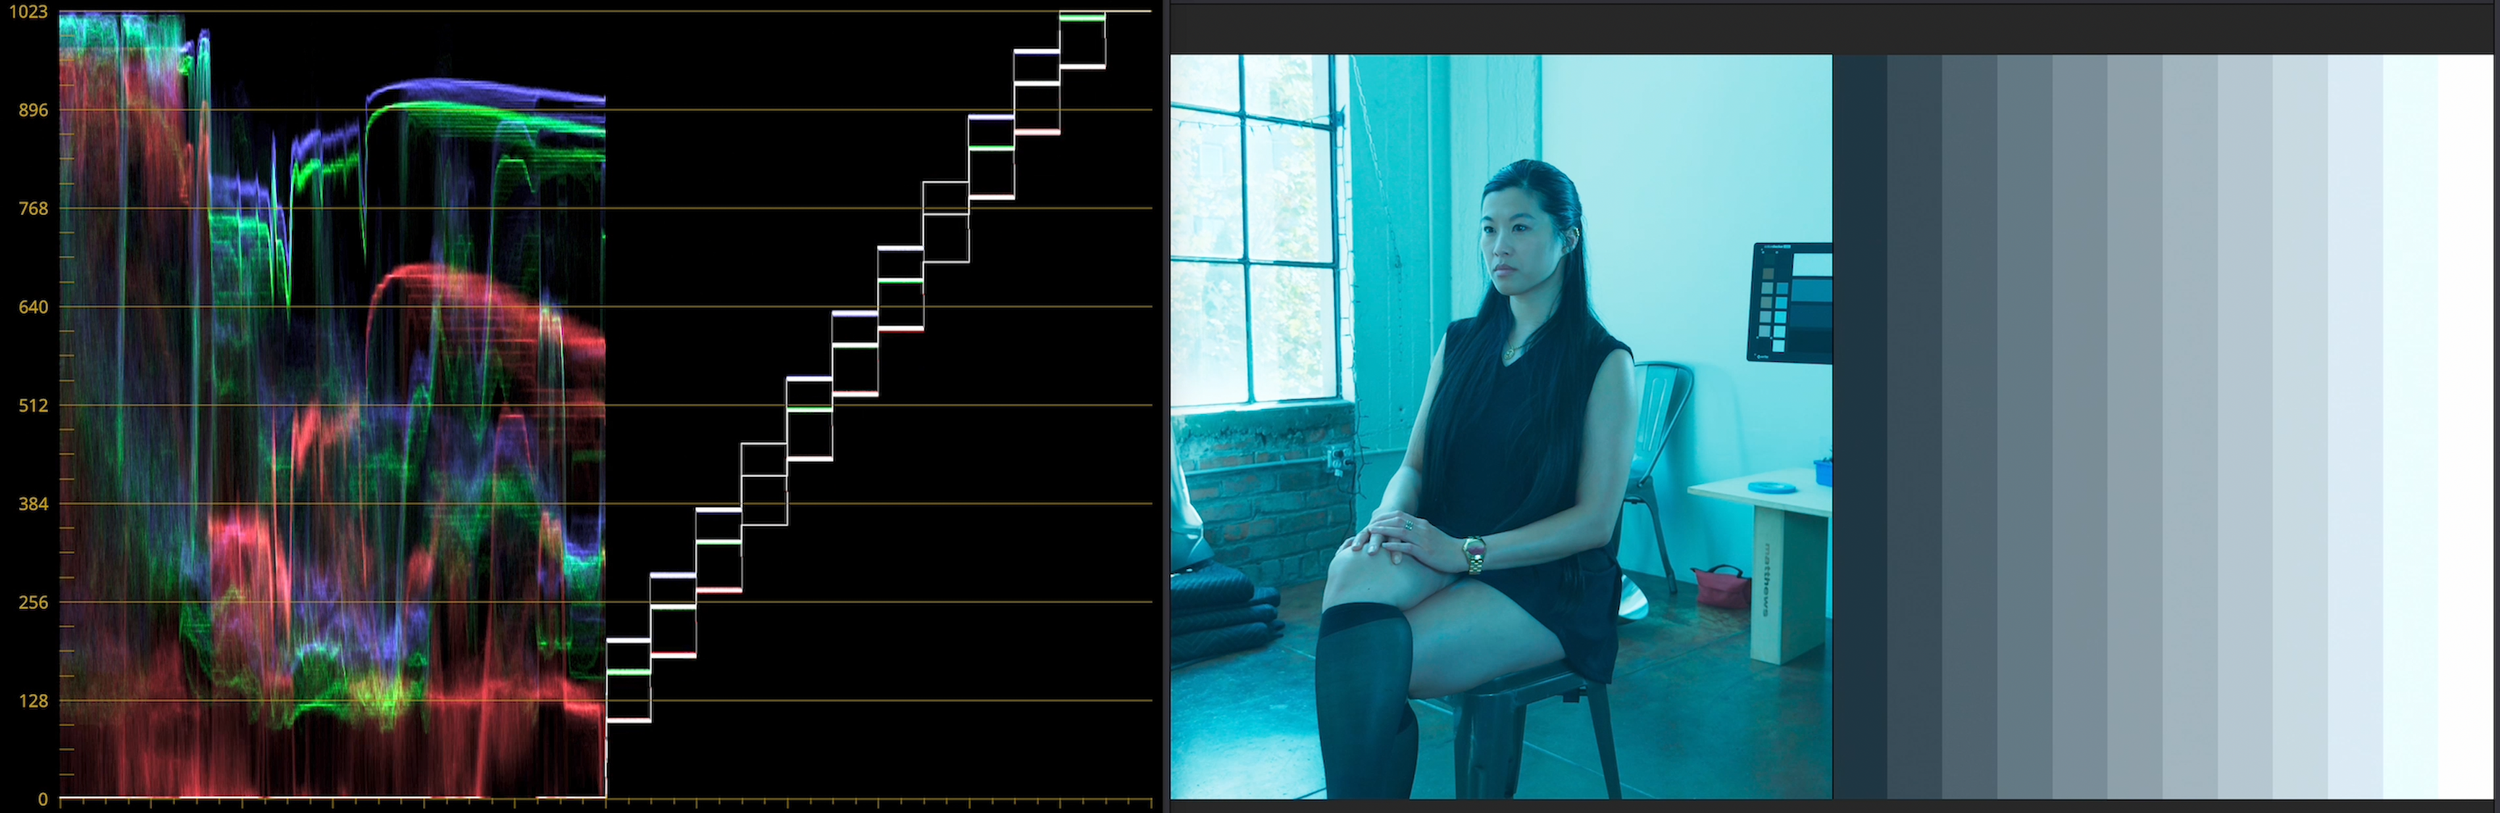
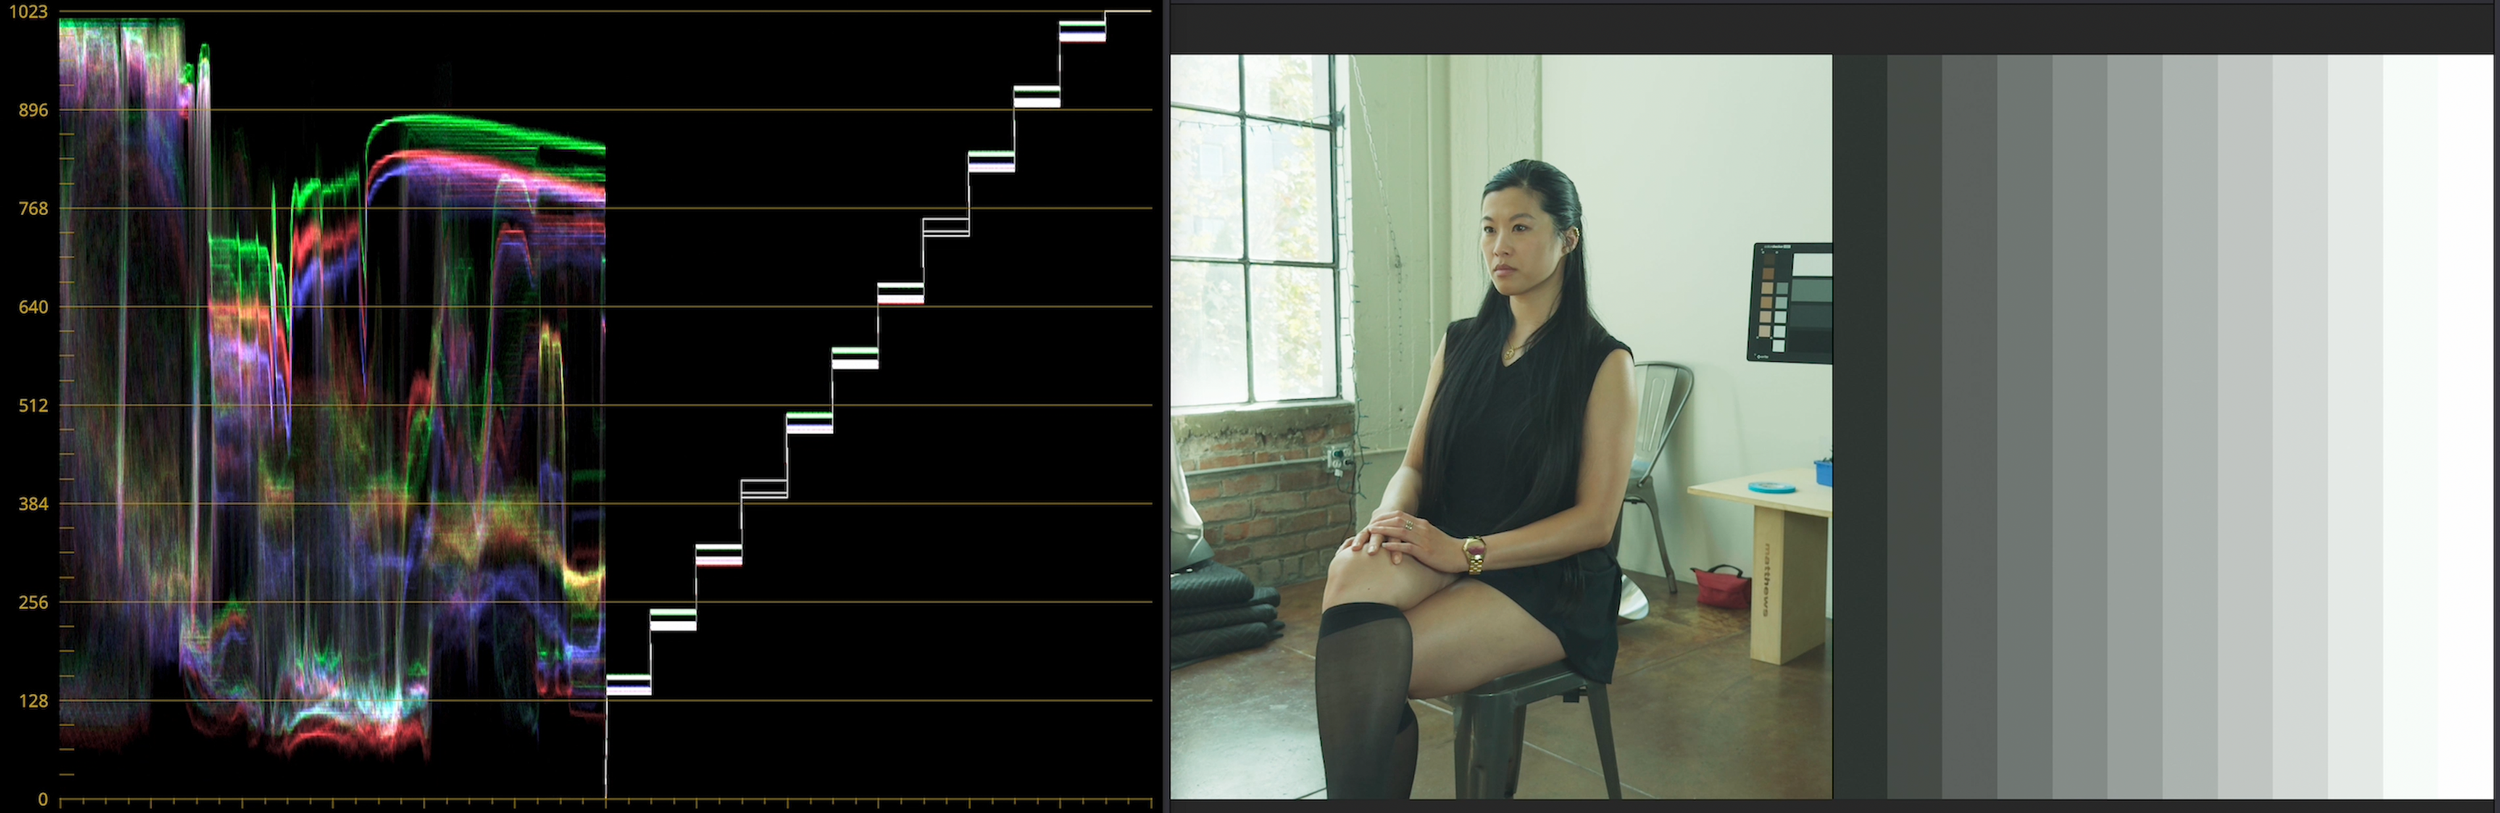
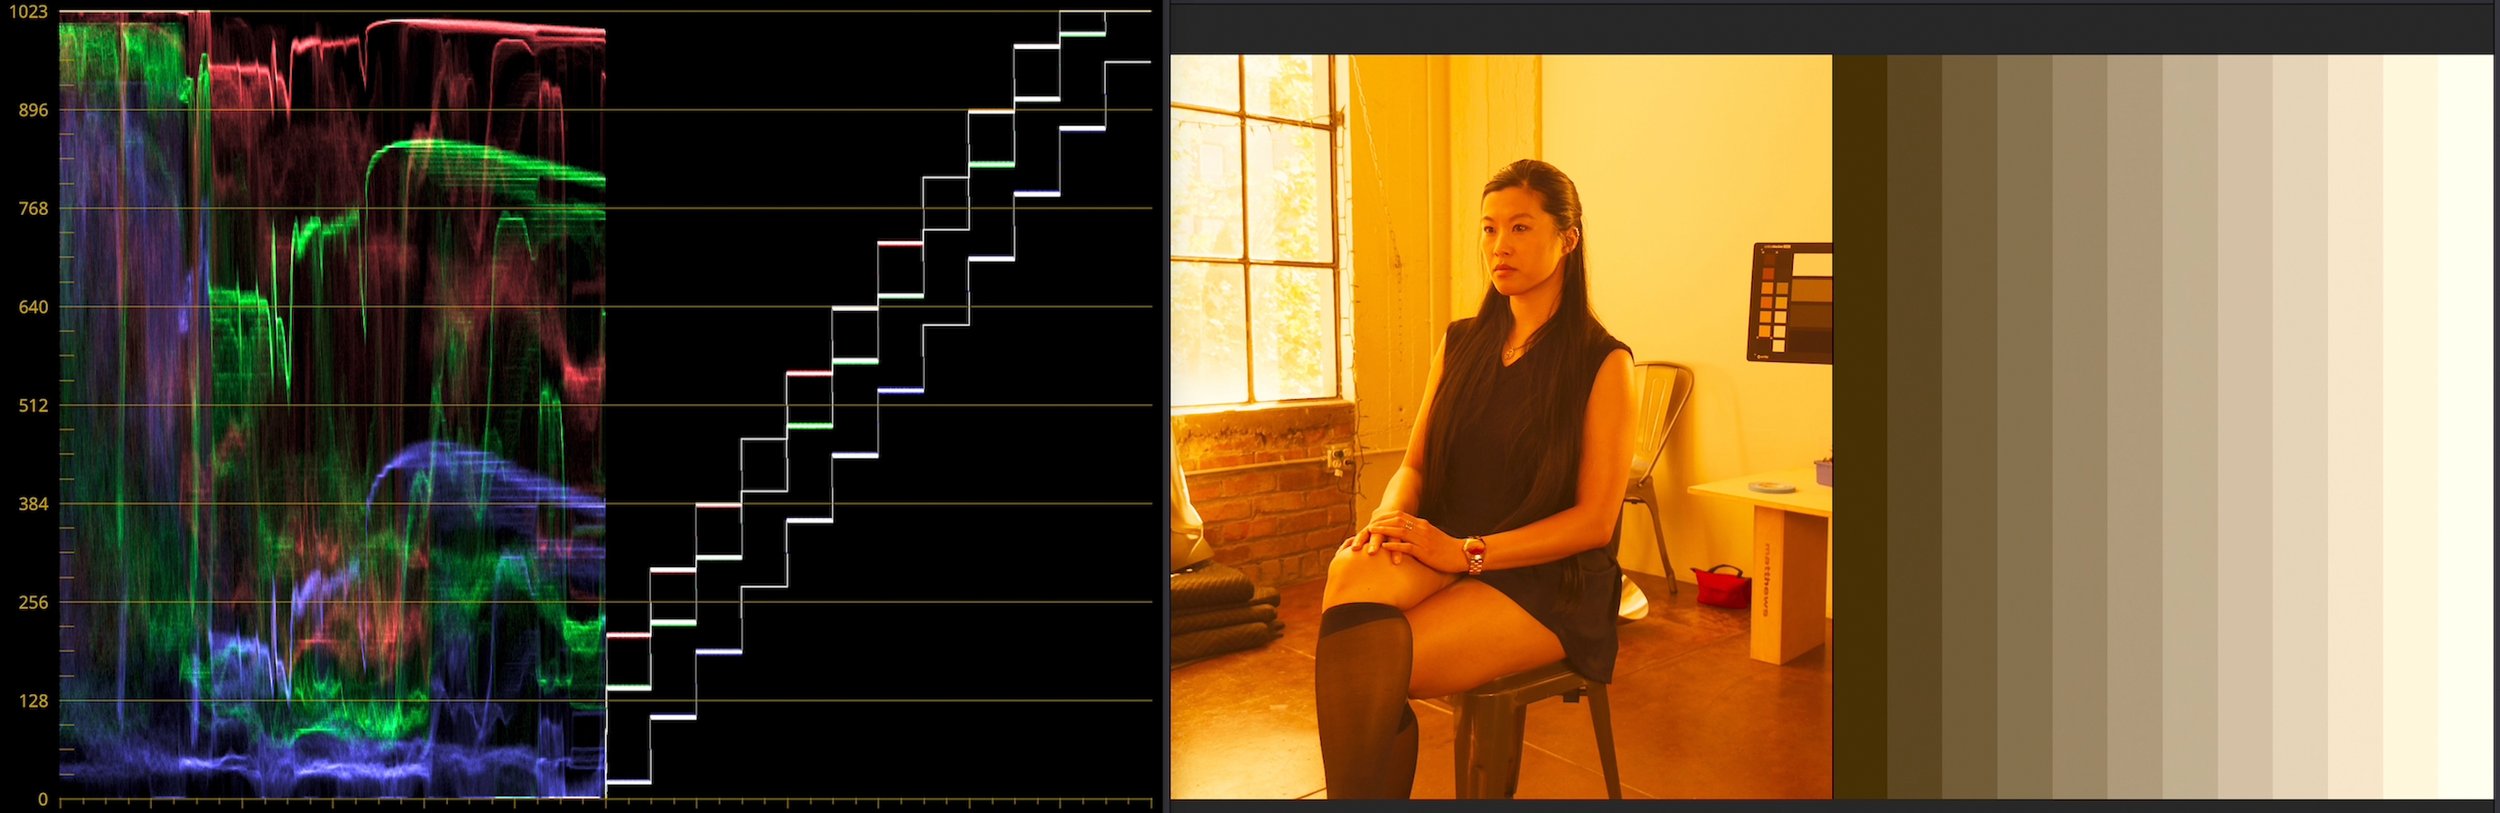
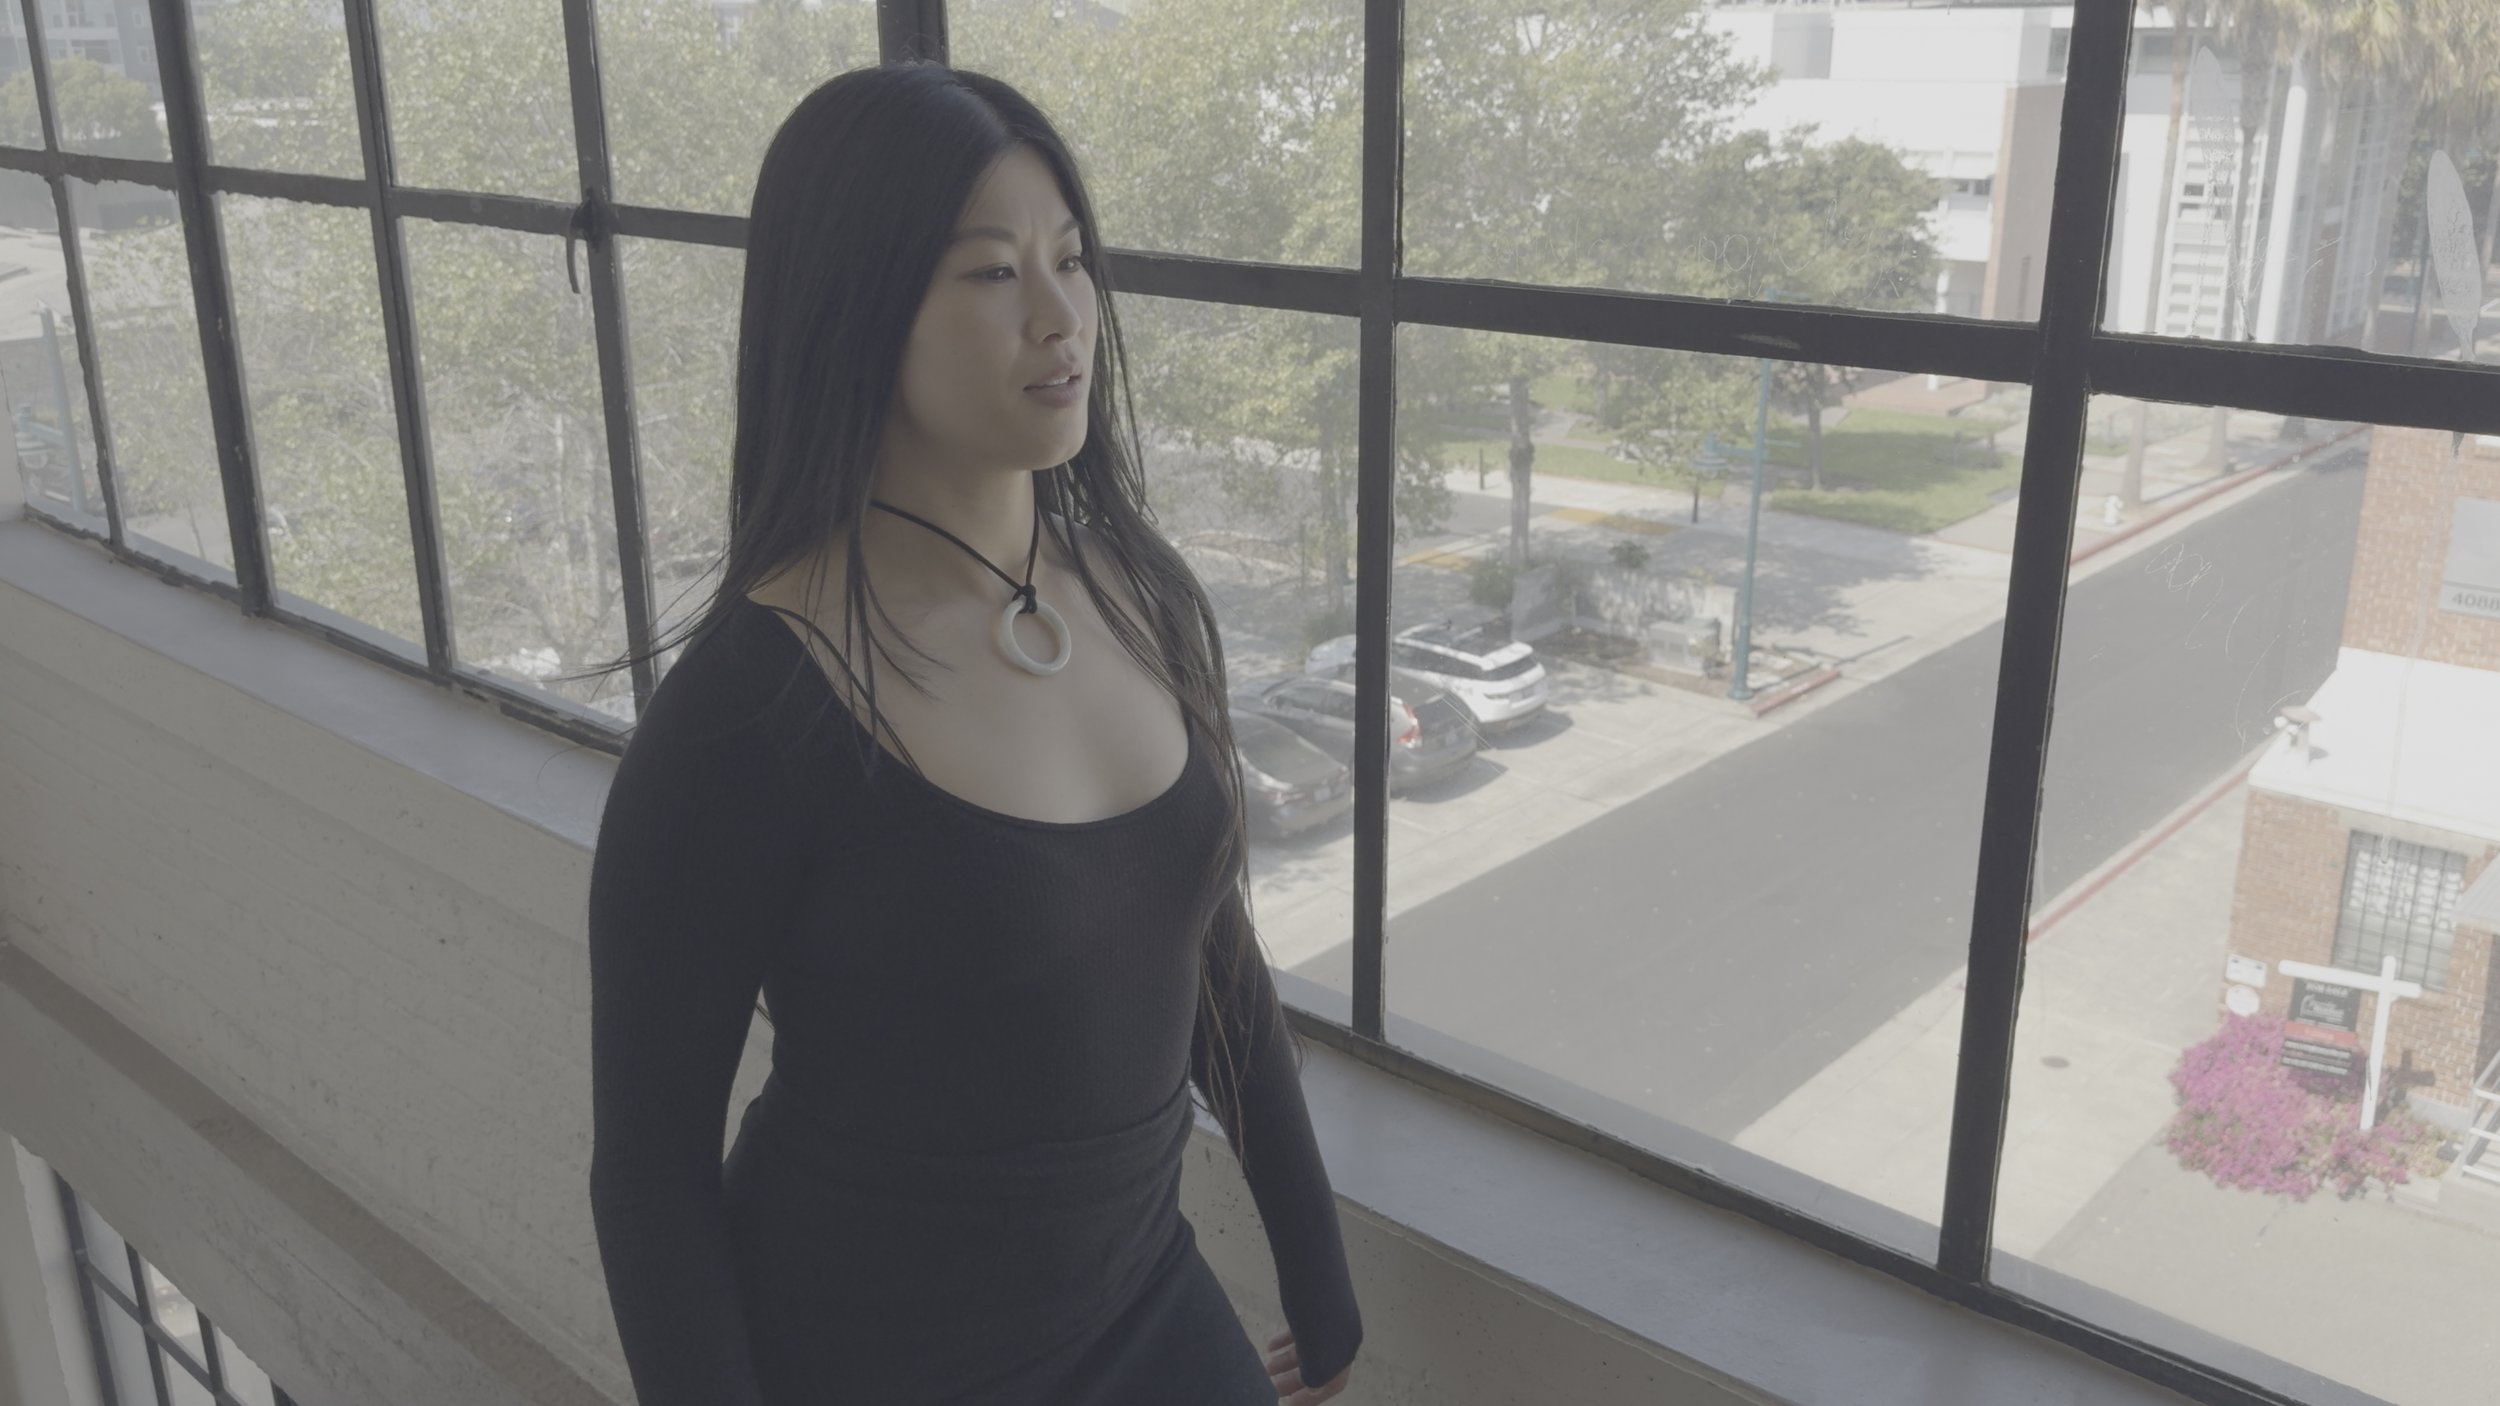
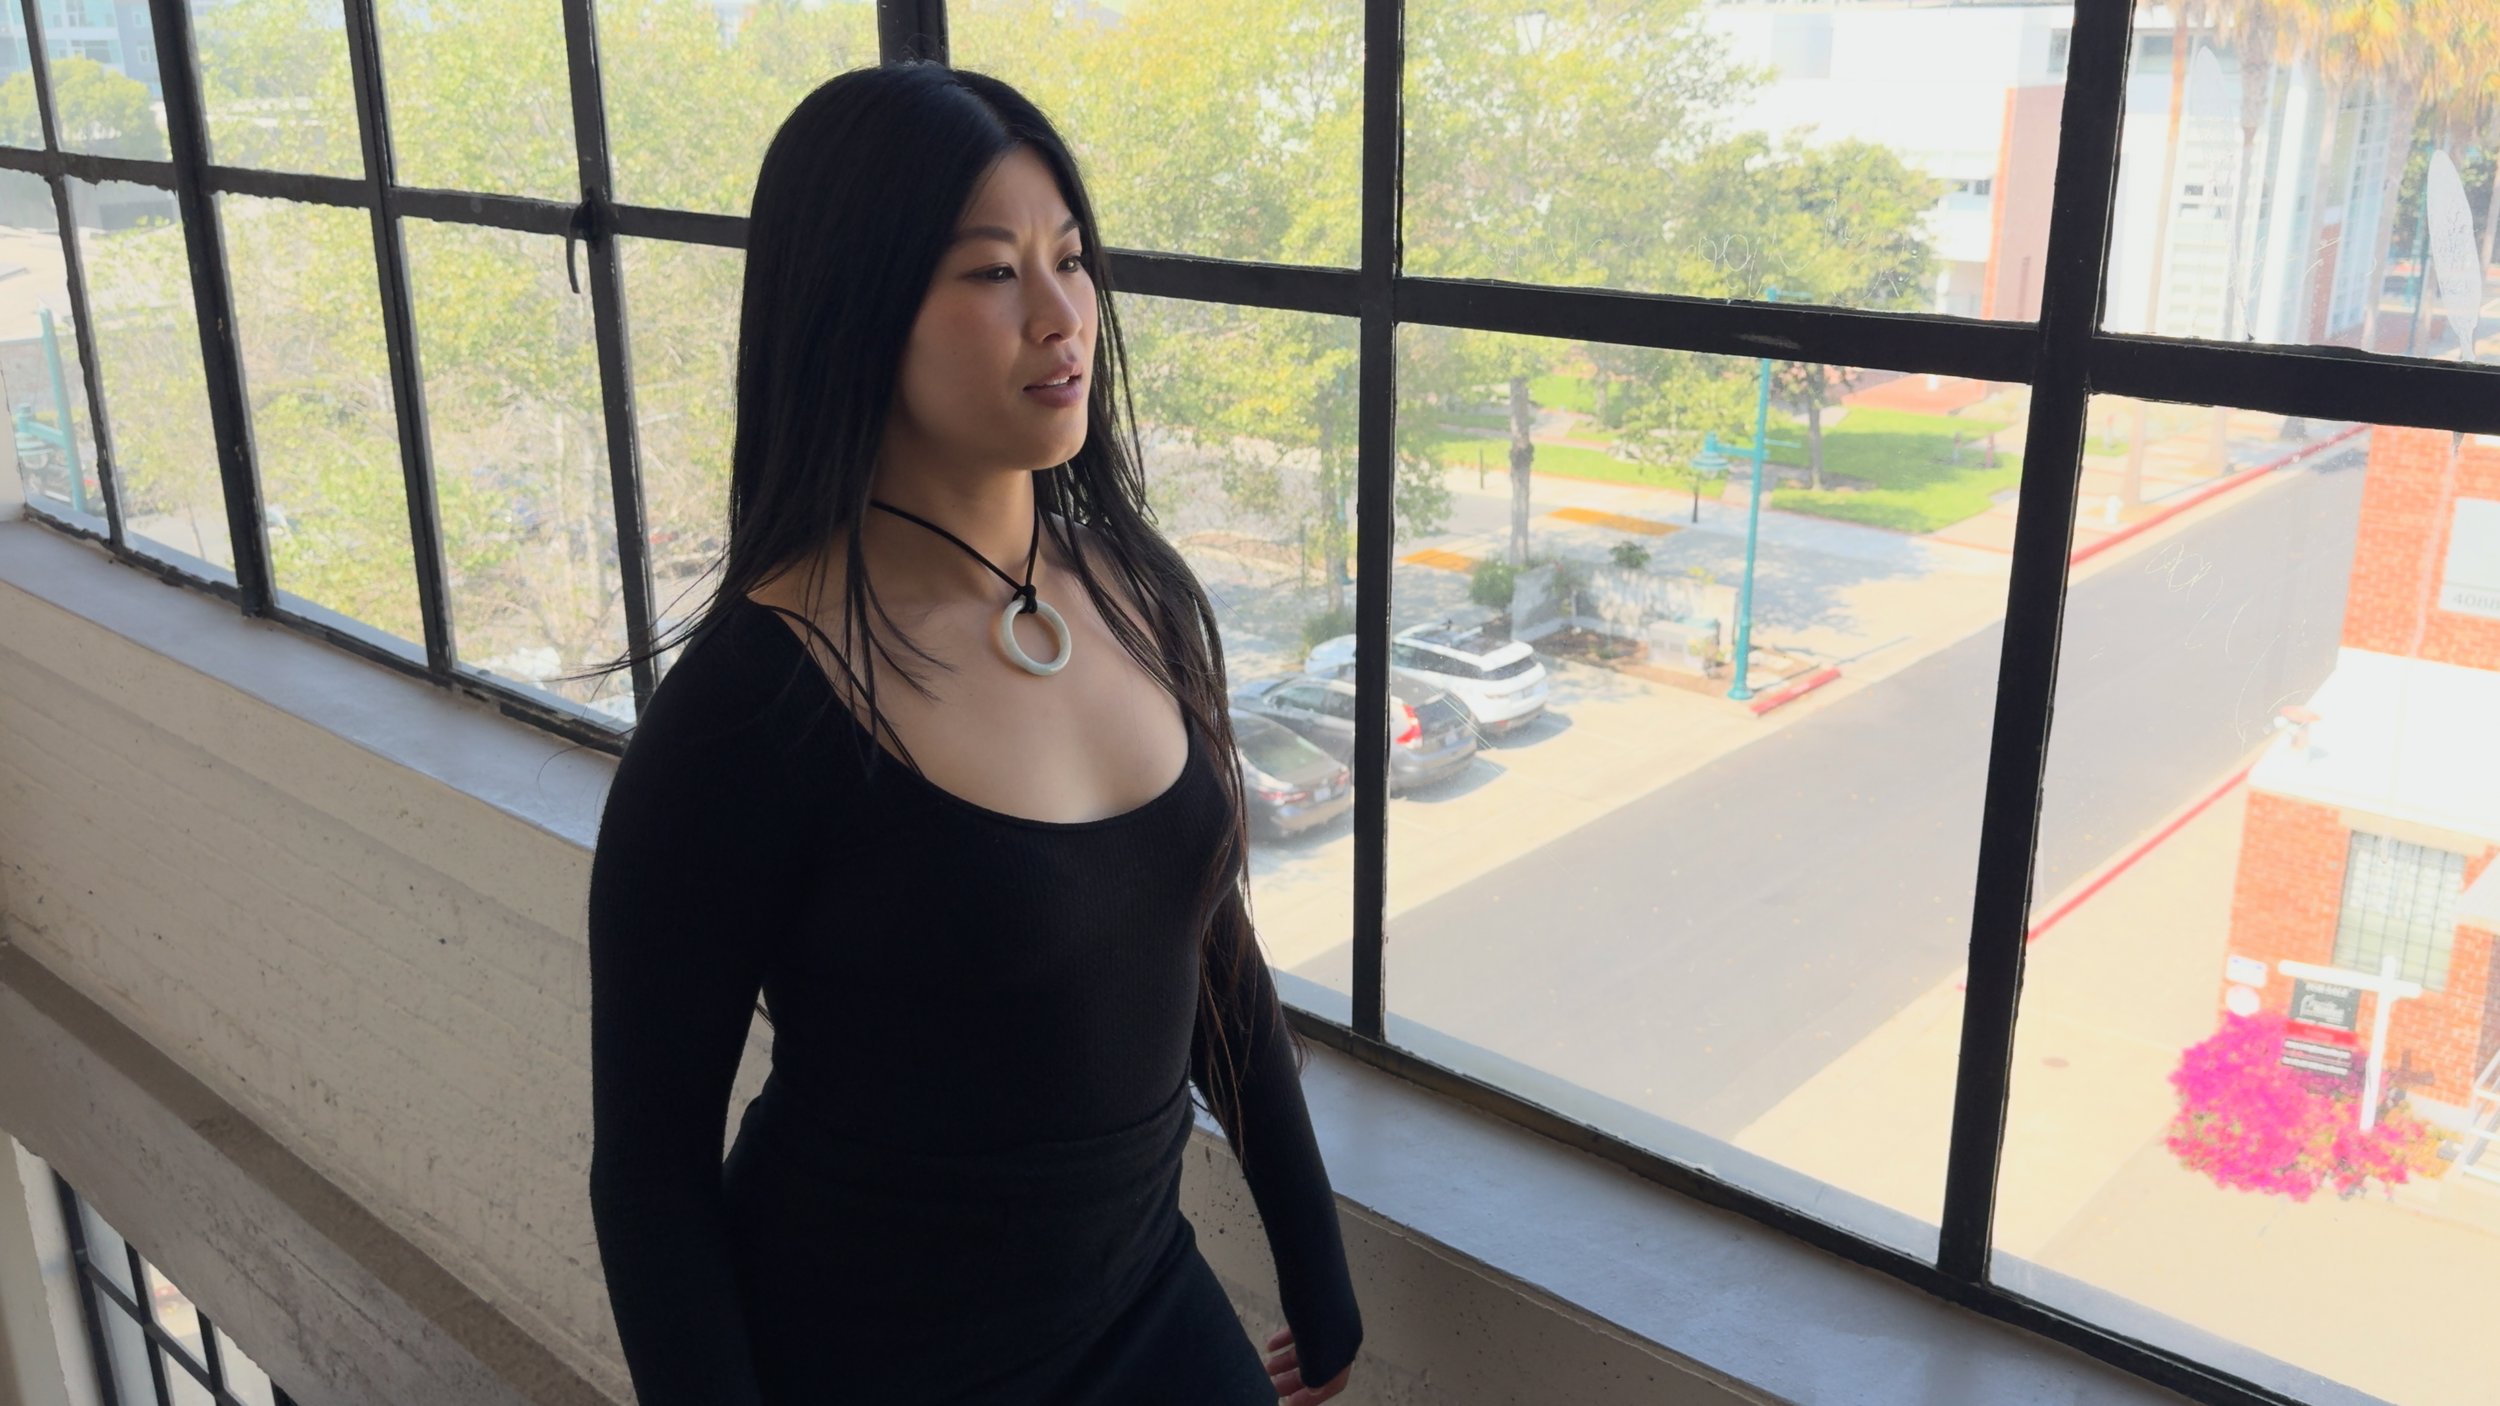
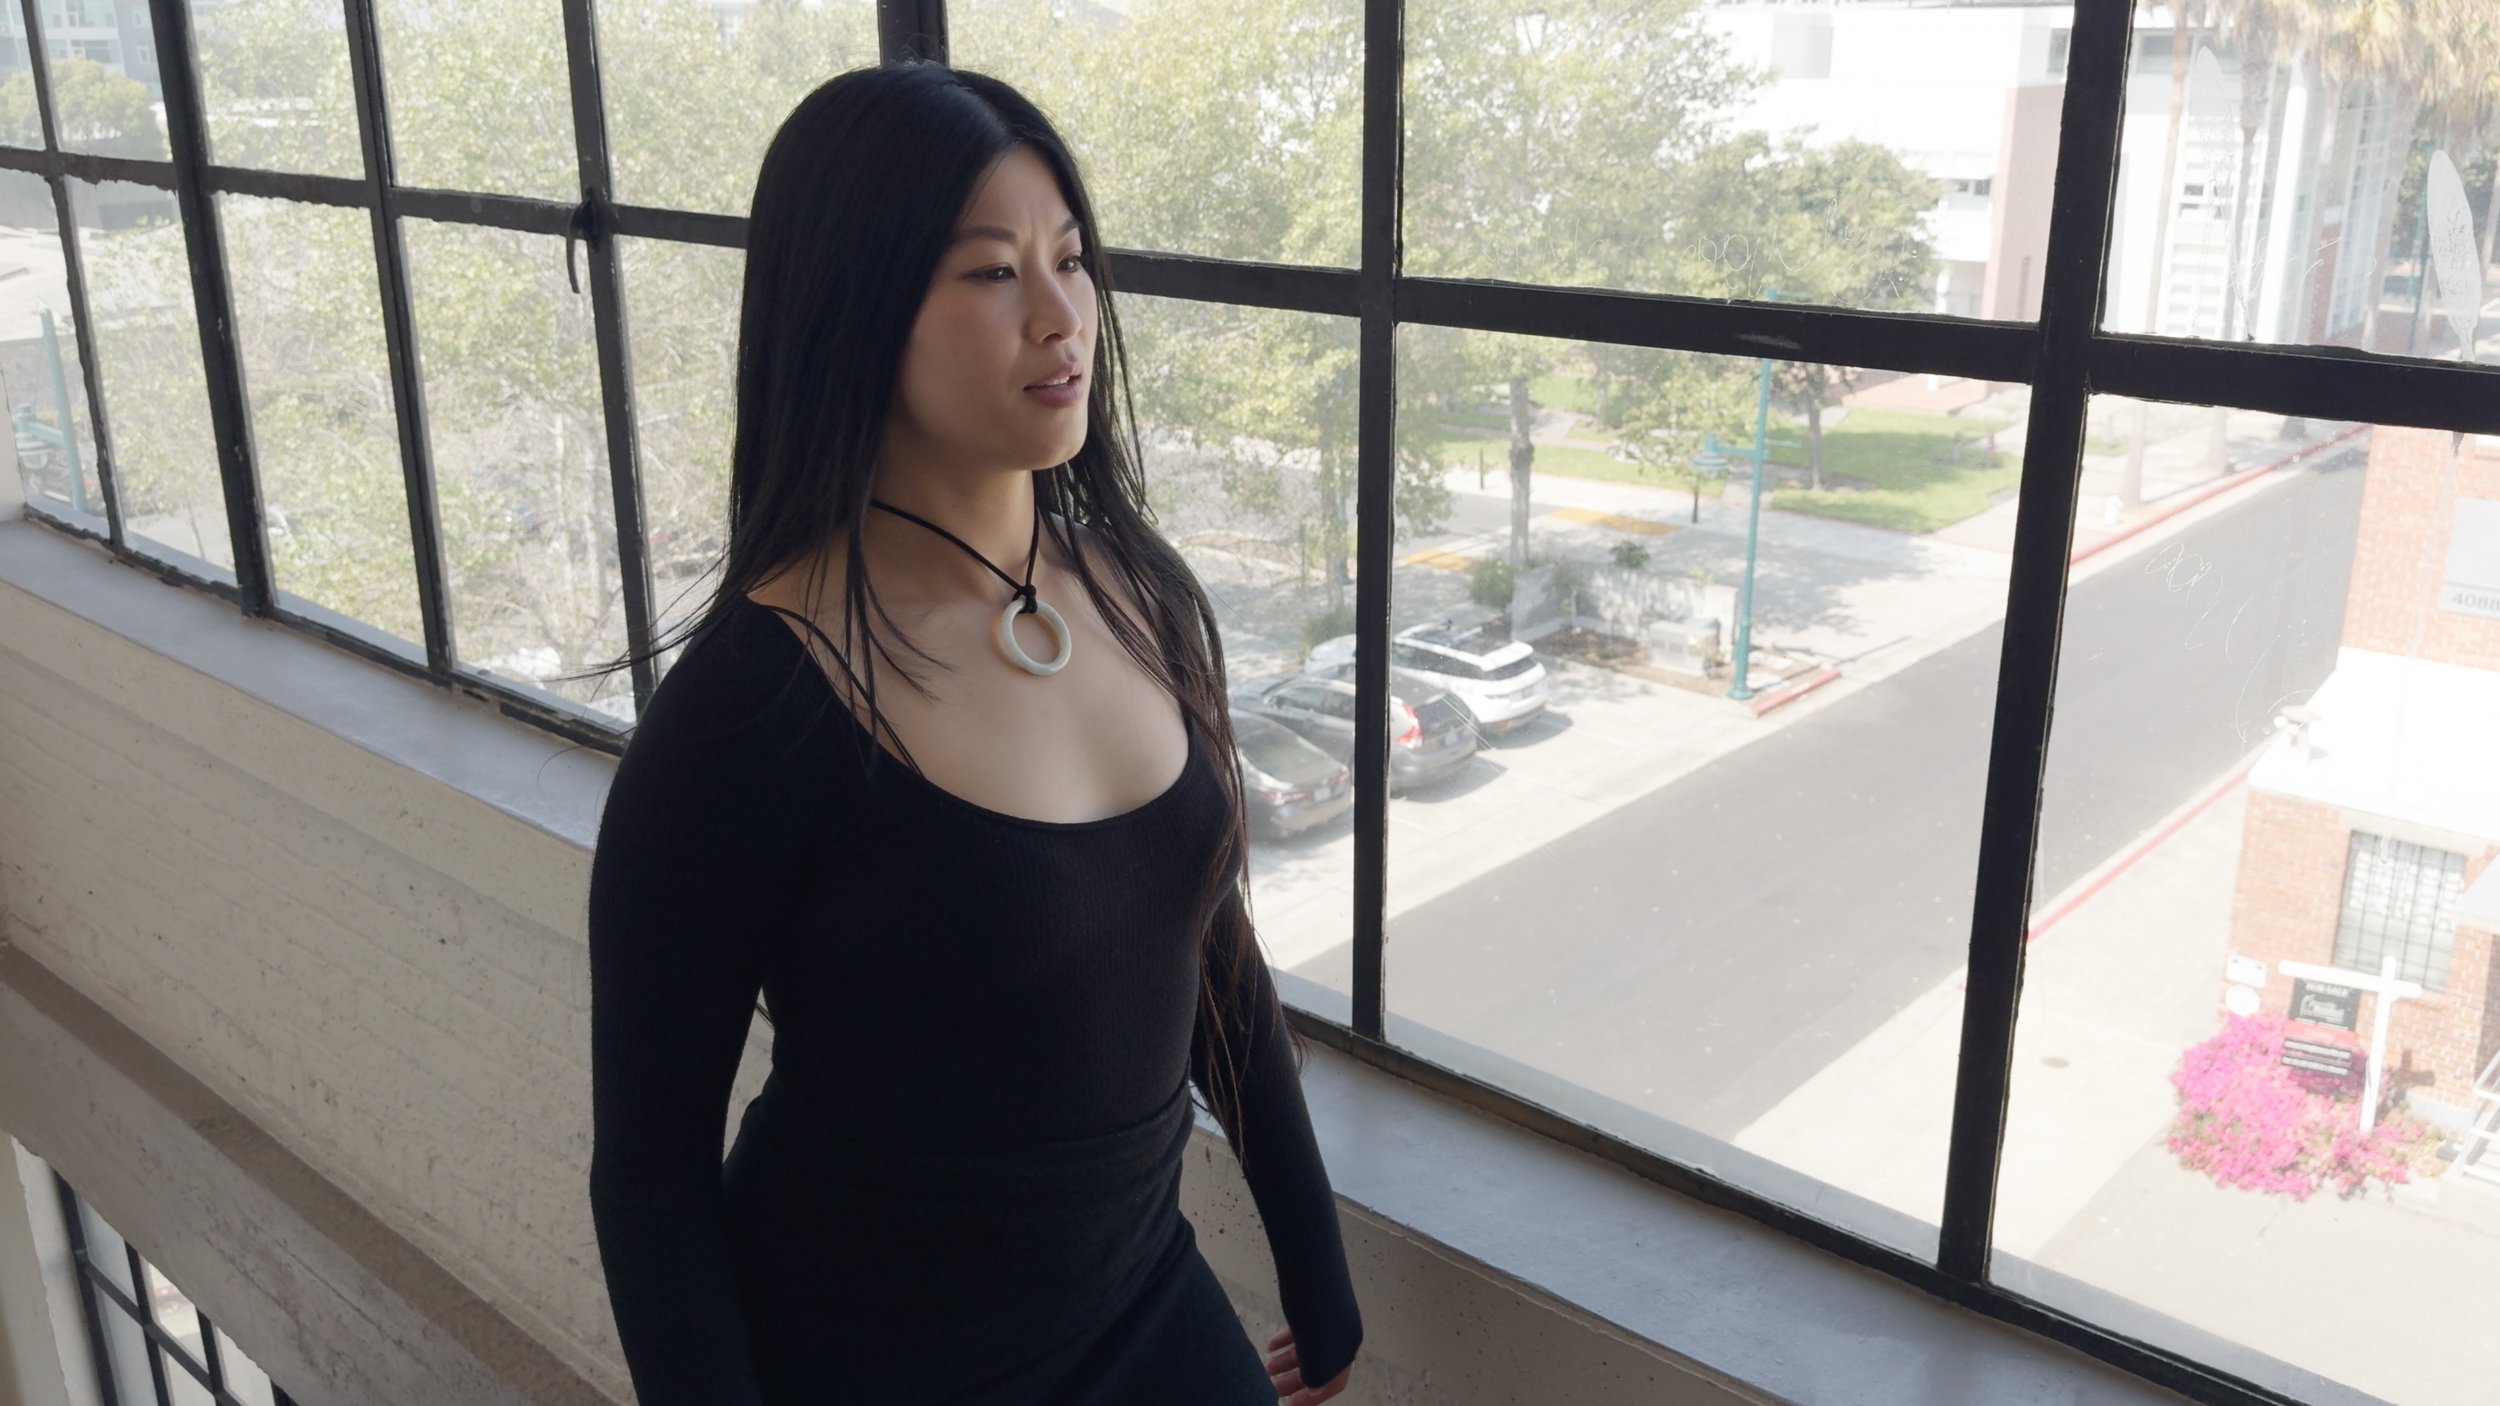
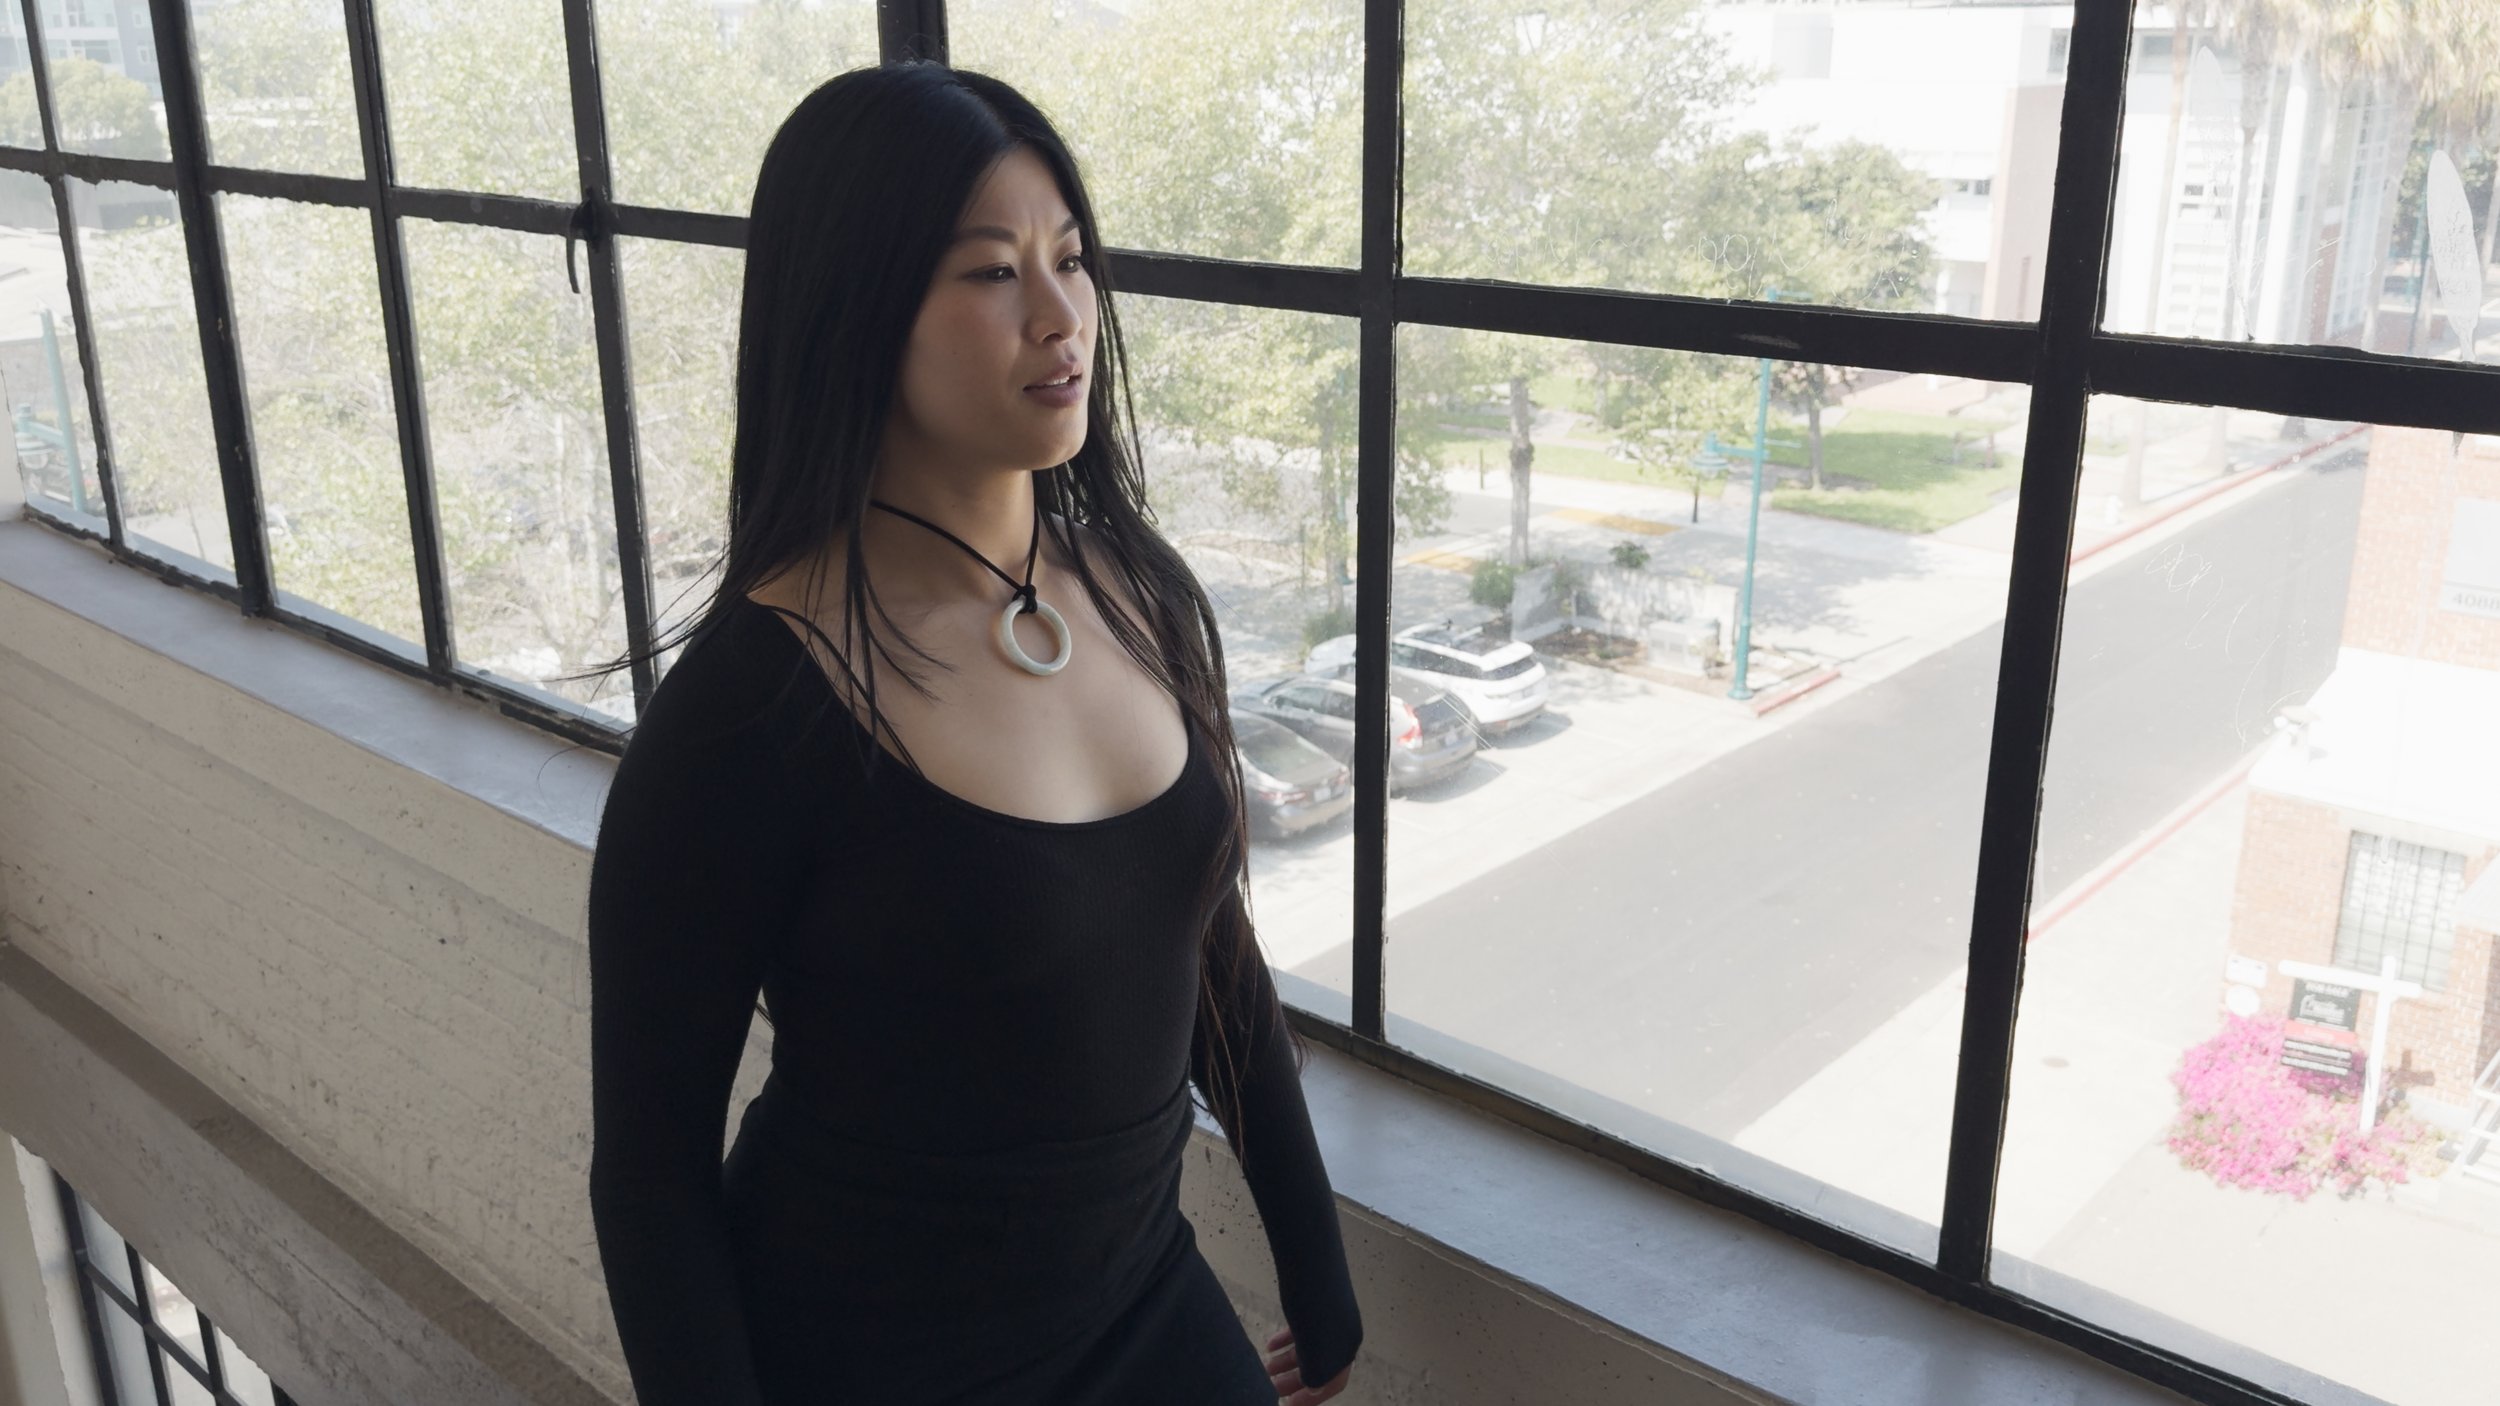
Log footage from iPhone 15 Pro Max with various LUTs and looks applied. Model: Karen Lum (@womanlystateofmind)

You Didn’t Explain What Log is Though

But what is the log of log? What does this math concept mean to me?

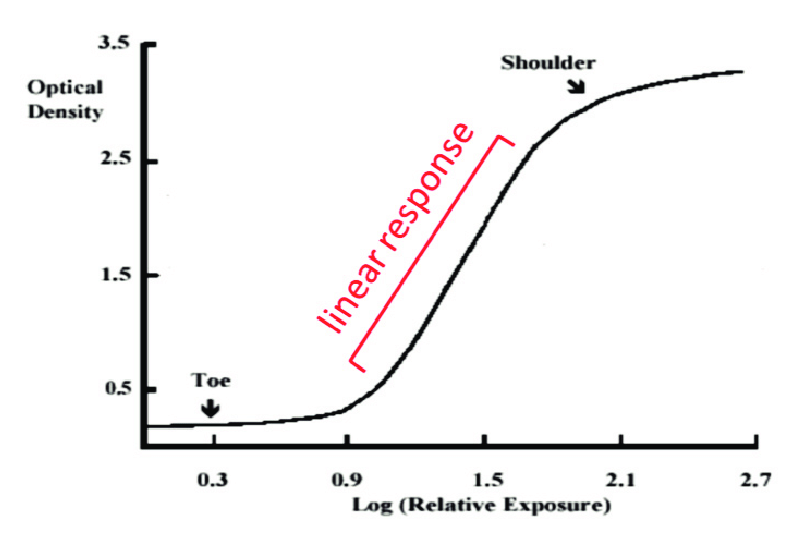
The essence of log (in its purest form) is that every stop of light gets the same amount of data. Ten-bit footage holds 1,024 shades of gray. To represent 12 stops of light values (or dynamic range), that means each stop gets about 85 shades of gray.

This means highlights and shadows all have detail that you can access for basic color corrections like exposure and white balance. You can recover some shadow and highlight detail, and make substantial color adjustments that look natural.

In this hypothetical example, we spread 12 stops of light evenly over 1,024 shades of gray.
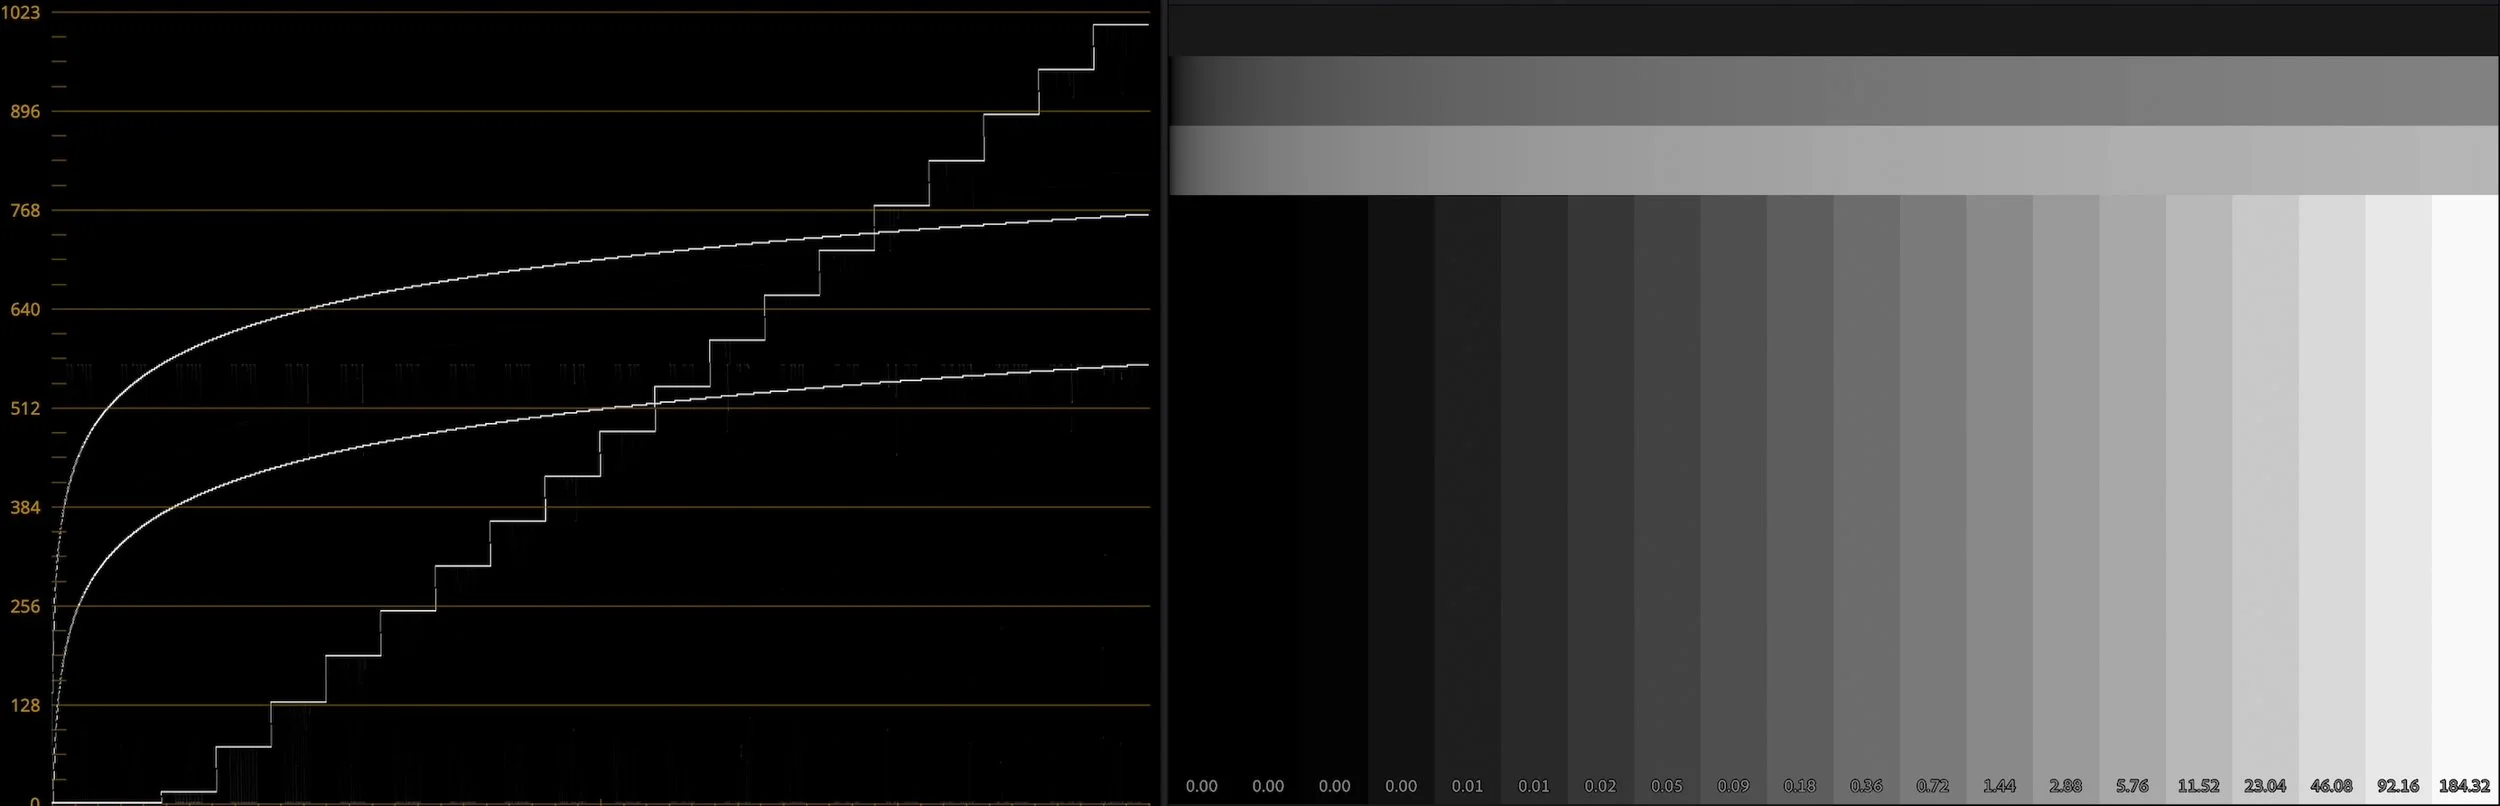
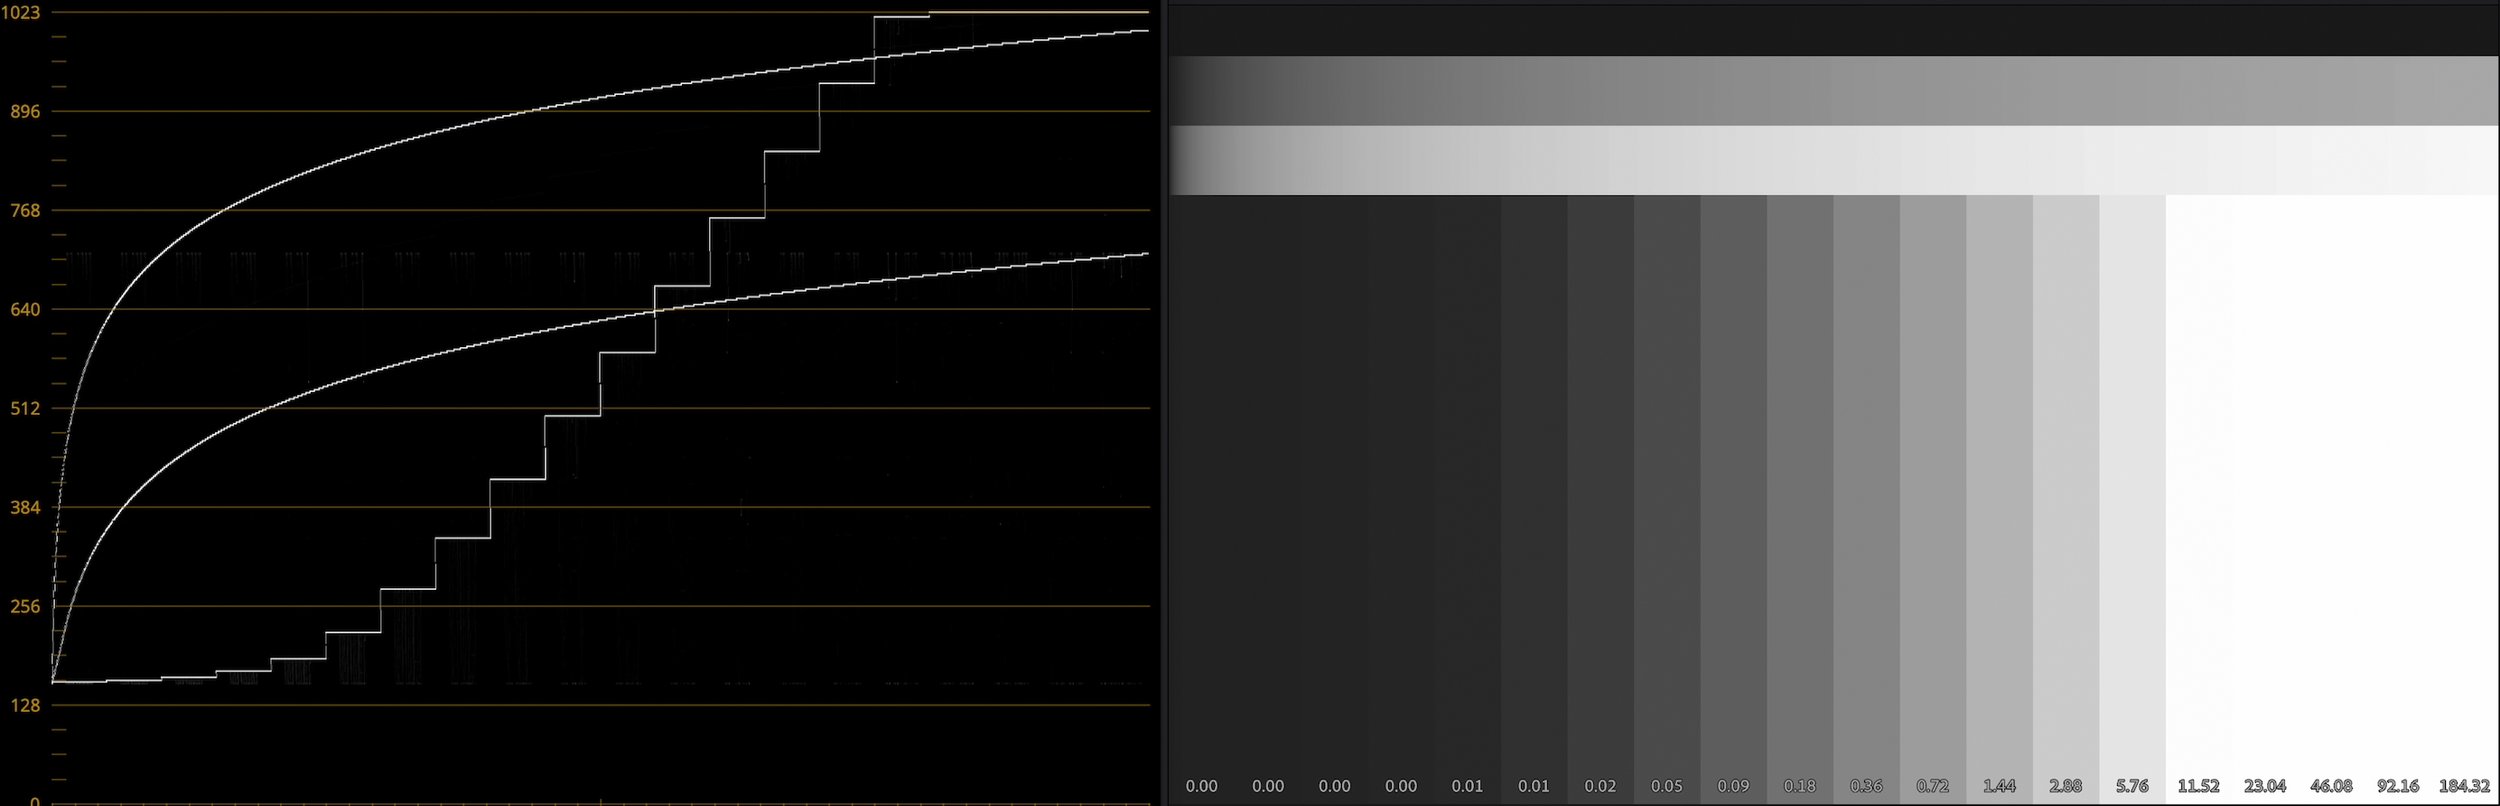
In Log We Offset

It also means that these basic color adjustments are dead simple to perform. Since each stop (in our semi-made-up example) is 85 shades of gray, adding 85 to the value of each RGB pixel is the same as increasing the exposure by one stop.

We call this adding and subtracting Offset, and Davinci Resolve has a whole color wheel devoted to it. In Magic Bullet Looks, the Global color wheel in the 4-Way Color Tool does an offset adjustment in ACES log, even if your source footage isn’t log. With log footage, Offset is the most natural way to correct, tint, or re-expose your footage.

These kinds of simple corrections look terrible when done after the LUT, or to video-space footage, but when you do them to the log pixels before the LUT, the results look so natural, it almost appears that they happened in-camera. This makes it much easier to achieve consistent color across shots, as they all get the same last step. This is why it’s such a common workflow to put Magic Bullet Looks, for example, in an adjustment layer over all the shots in a sequence.

Sun Dog

Log corrections look natural in part because the simple color-grading math lines up with how light works. They also look great because of the available dynamic range.

If I try to recover some of the detail in my dog’s sun-lit fur, this iPhone 12 footage rapidly falls apart. The iPhone added contrast, and in doing so smooshed the white values into a uniform overexposed patch. Nearby colors are posterized, and the clipped highlights give the shot away as consumer video.

Source: Kodak

But with this iPhone 15 Pro Max footage shot in Apple Log, I can recover all the detail — or just let it overexpose gracefully into this ACES output transform, for a smooth, film-like look. This soft highlight rolloff in the log-to-video conversion is called a “shoulder” in film, describing the upper part of the classic s-curve. A nice shoulder for your highlights is a big part of what makes footage look “pro” — especially when your grading happens underneath it.

Because log footage uses the same amount of data for every stop, it’s not the most efficient way to store an image. So log is best when it’s at a high bit depth and data rate. Apple Log is only available when recording in ProRes, which is typically 10 bits-per-channel. Apple added ProRes with the iPhone 13, but without log it wasn’t very “pro,” and I almost never used it. The baked-in look made grading difficult, so there was no reason to take on the burden of the massive files.

Heavy is the ProRes, Dangly is the Drive

Apple and Samsung, sitting in a tree.

Yes, massive. 4K ProRes files are big, and recording them to your phone can create some weird workflow challenges. Apple shocked us all by addressing this head-on: The iPhone 15 line charges via USB-C instead of Lightning, and this standard USB port can do a lot. When you connect a USB-C drive, your ProRes Log video automatically gets recorded there instead of to the phone’s photo library.

Recording this way also unlocks 4K 60fps recording in Apple’s Camera app, enabling some gorgeous slow motion effects when played back at 24 fps.

In just two years, Apple has gone from refusing to sell you a pro laptop with an SD card reader to making a camera that records to external media. We’ll all be looking for iPhone rigs with places to strap these little drives.

Drive 1, Drive 2

Log is Half Baked

In this unprocessed log clip, the purple light reflections appear over-saturated.

With its high bit depth and dynamic range, log footage has many of the benefits of raw. But Apple Log is not raw, and not even “straight off the sensor.” It’s still heavily processed — denoised, tone-mapped, and color adjusted. You can see this big time if you shoot bright, colorful lights. Even though Apple has turned their sharpening and tone mapping way down for Apple Log, there’s still some of that telltale overdriving of super-bright, super-saturated colors.

It’s also important to note that log does not mean you’ll never overexpose. It’s still an iPhone with a tiny sensor, so don’t expect the dynamic range of an Arri Alexa or a Sony Venice.

Blackmagic Camera App

The other way Apple doesn’t quite live up to the “pro” promise of log is by not offering much manual control in their camera app — and that’s totally fine. Because all the control you could want is found in the wonderful new Blackmagic Camera app. It’s a free download, presumably meant as a gateway drug to Blackmagic’s paid products and services. It’s a terrific app with a gorgeous UI and pro features like a live histogram, display LUTs, HDMI out via USB-C, and choices of different ProRes formats.

Note that the shutter speed is set in degrees! What a time to be alive.

VFX Log

The flatness of log gives you the power to make it your own in the grade. The other huge advantage of log is that it is known, meaning it’s possible to convert it to and from various color spaces accurately. This is a huge advantage for VFX artists and colorists alike. Colorists can convert Apple Log to whatever color space they like to work in, and accurately incorporate iPhone footage into any color timeline. VFX artists can convert their log footage to scene-refererred linear and create accurate composites that include color-matched 3D renders.

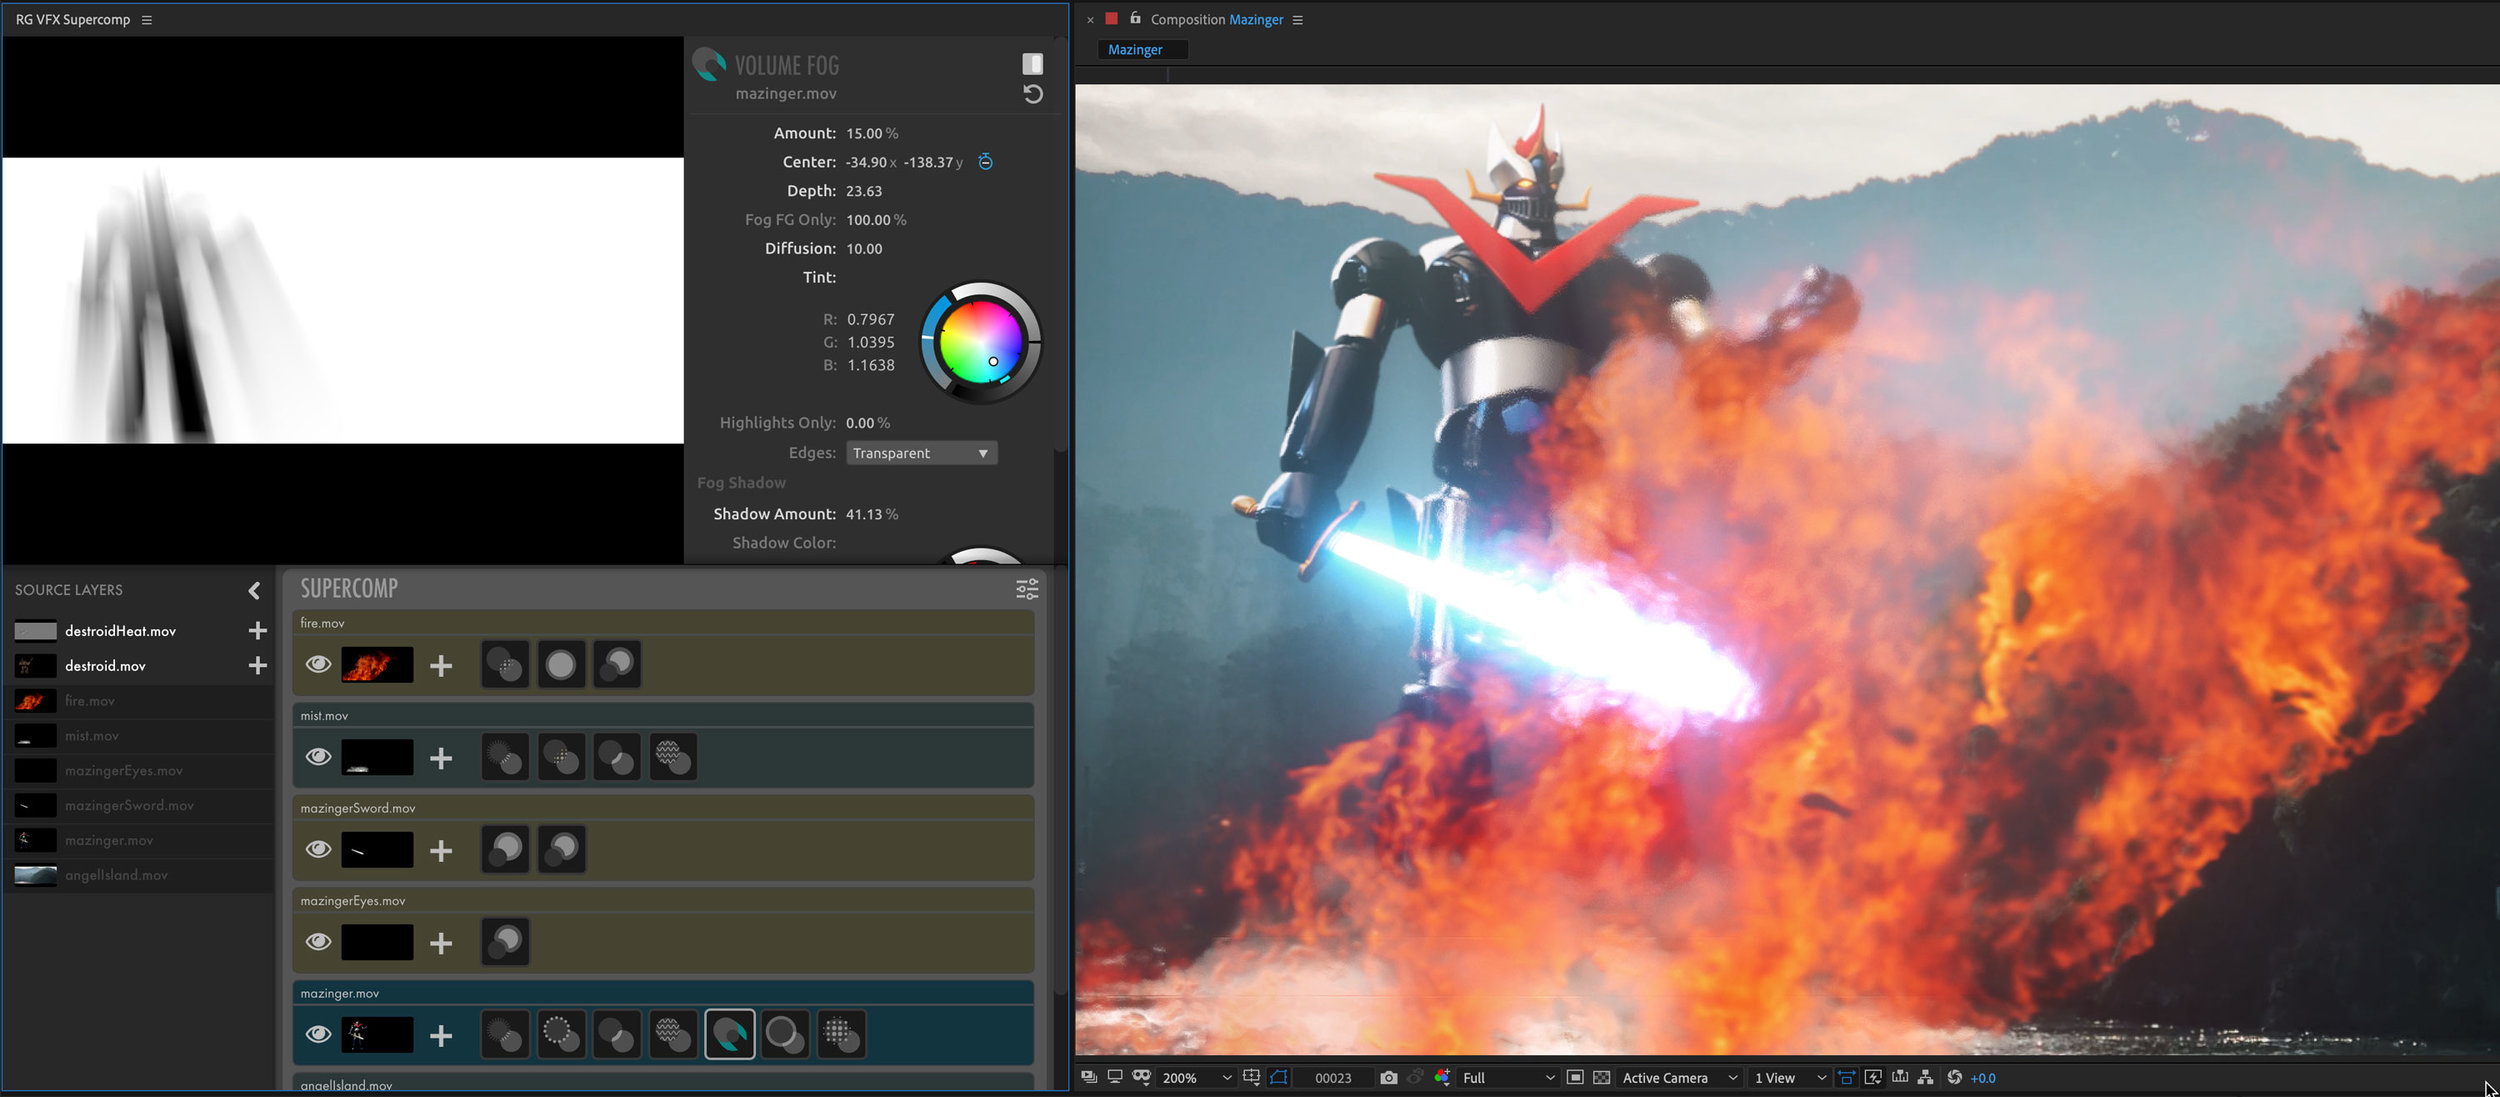
In this example, I converted the footage to EXR and camera-mapped it onto simple geometry in Cinema 4D. In Redshift, those HDR pixel values cast light and reflections onto the 3D model, doing 90% of my lighting for me:

ACES Compatible?

Apple’s log format being known is all it takes for compatibility with ACES, the Academy of Motion Picture Arts and Sciences color management system. But it’s important to note that Apple Log does not match any pre-existing ACES format.

The log curve is Apple’s own, which they’ve documented, and it’s already available in DaVinci Resolve. In the CST node, choose Apple Log for the Input Gamma, but choose Rec. 2020 for the Input Color Space, because Apple Log uses the Rec. 2020 primaries.

With these as your inputs, you can either convert to Rec. 709 video, or to an ACES format like ACEScc — which is also log, but a different log.

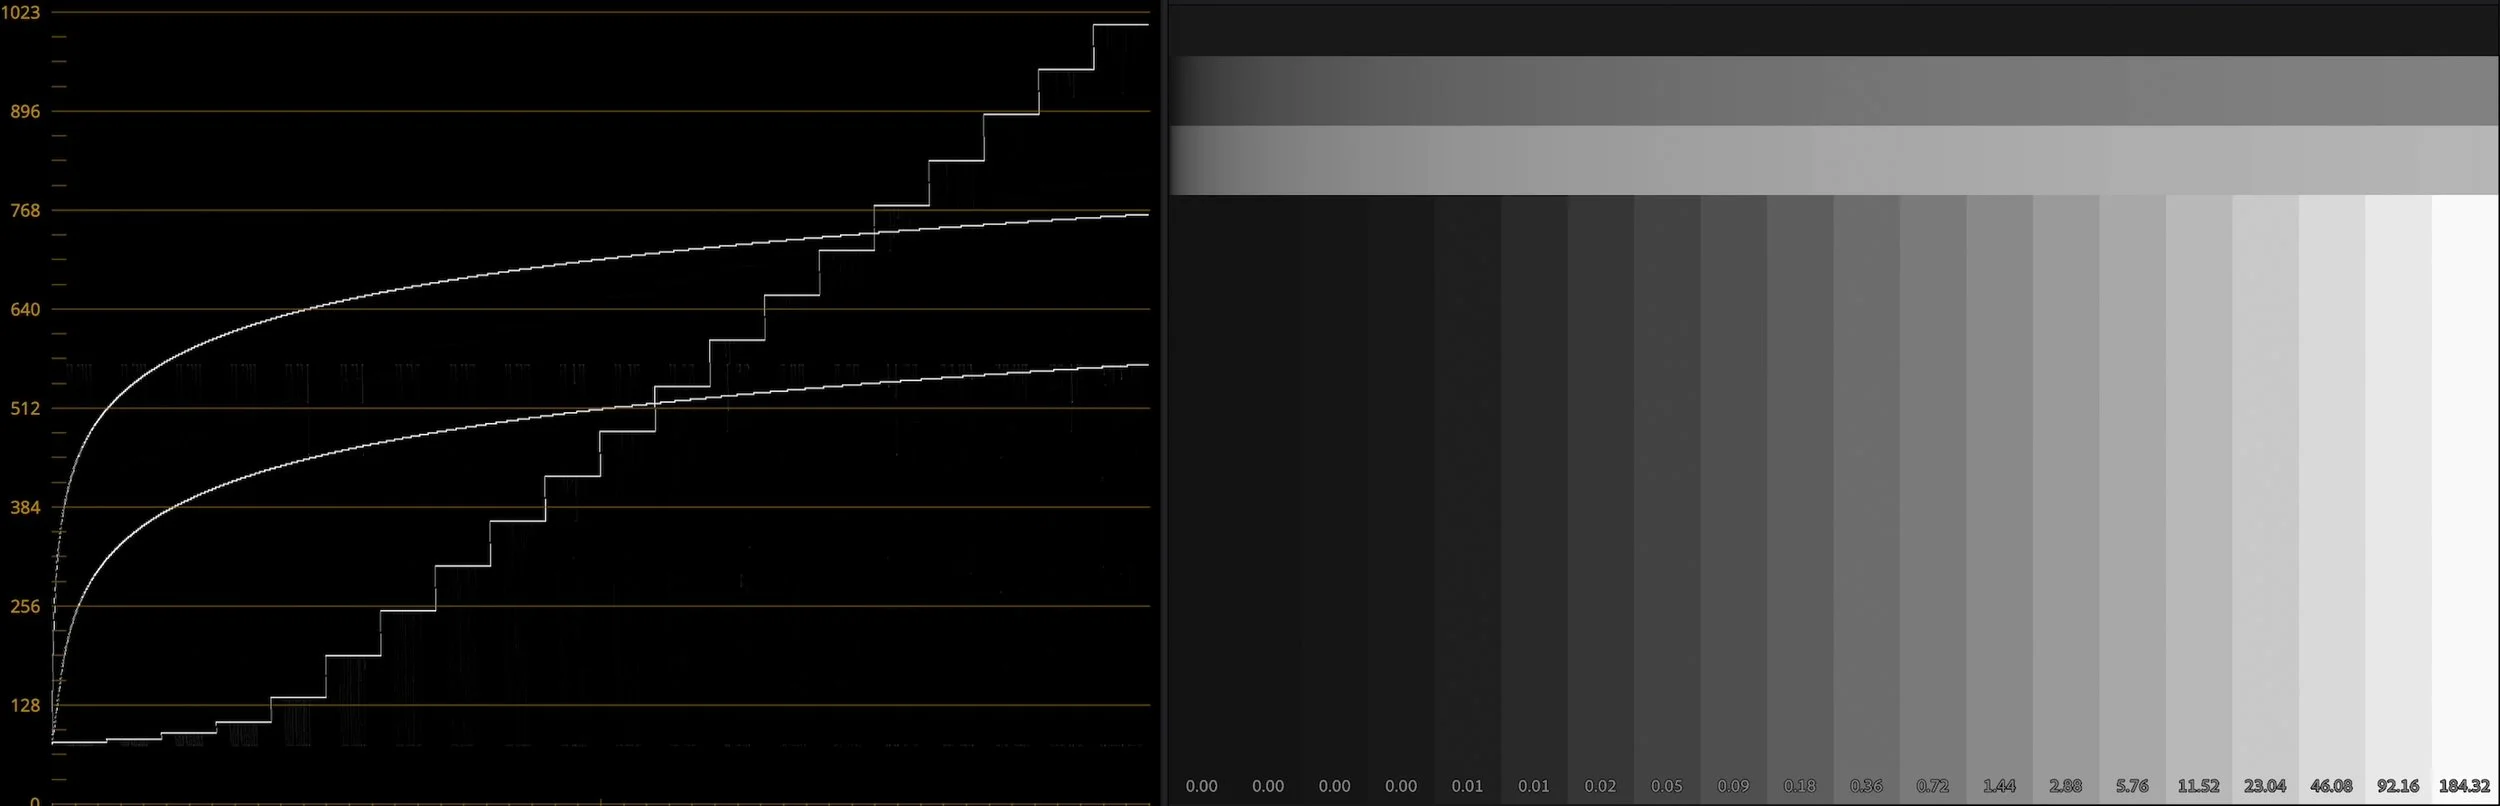
Remember when I said log uses the same amount of data for each stop? That’s not entirely true with Apple Log. The darker stops are compressed a bit, to control noise. If you’re familiar with ACES, this makes Apple Log more similar to ACEScct than to ACEScc. Many colorists prefer working with ACEScct because of the way it handles shadows, so Apple is in good company here.

Along with documenting their unique transfer function, Apple has supplied a LUT for converting from Apple Log to Rec. 709 video. Apple’s LUT is very rich in contrast and saturation. This is useful if your goal is to match the look of non-log iPhone footage, but I found it too colorful for some applications, so I created my own LUTs that roll highlight colors off more naturally.

While Resolve and Final Cut Pro both offer built-in support for Apple Log, some other tools don’t yet. So I also made LUTs for converting Apple Log to ACEScc and ACEScct — the ACES log formats designed for creative color work. With these LUTs, you can incorporate Apple Log footage into an existing ACES workflow without losing any color fidelity.

To some, true ACES compatibility would require Apple Log’s inclusion in widely-distributed ACES OCIO configs. Until that happens, Apple Log is ACES-compatible as long as you have a color-space conversion bridge — something like either the CST node in Resolve or the Prolost Apple Log LUTs, available below as a free download.

Magic Bullet Magic

With this workflow, I was able to run some iPhone 15 Pro Max footage through the ACES-compatible Magic Bullet Looks, using our new Diffusion filters modeled after real-world filters from Tiffen and others. Along with some basic grading, I also added some film halation and grain. The results have a rich, cinematic look that in no way betrays that it was shot on a consumer phone.

Rebel Without an Excuse

The argument about whether it makes any sense to shoot professional video on a consumer device dates back to before my book, The DV Rebel’s Guide. I love small, accessible cameras that allow us to shoot unnoticed in public places, but for years I discouraged the use of phones for this, because the ability to control and author the image just wasn’t there.

Now that the iPhone can shoot log, is the best camera the one you literally always have with you, or, you know, an actual good camera? The iPhone 15 Pro Max is going to tempt you to shoot real stuff with your telephone, and for the first time ever, I’ll be right there with you, thanks to log.

Skate Warrior 1992, 1999, 2020

You May Have Seen This Image Before.

In The DV Rebel’s Guide, I used this still frame as an example of guerrilla filmmaking taken too far. Which may also be an apt description of the entire film from which it was taken.

In the summer of 1992, while I was home in Minnesota between terms at CalArts, I imposed upon the good will of my crew of childhood friends, asking them to appear in, crew for, and largely out-of-pocket fund, a film called Skate Warrior.

I did this without:

  • Money
  • A driver’s license
  • A camera, or any of my own filmmaking gear at all
  • Any good sense.

What I did have was time. Time to “write” a “script,” to endlessly storyboard, to plan and tinker and spray-paint toy plastic guns in my parent’s basement. I had the boundless energy and poor decision making of a kid only two year out of high school. Add to that a deep love of action movies, and some crazy ideas that a person could make one with next to no budget.

I storyboarded Skate Warrior on 3x5 notecards, which I kept in a binder that appears in the background of several shot in the film.

But in truth I did have one mighty resource: the community of my close friends and family. It simply never occurred to me, nor, seemingly, to them, that they should not drop everything to spend countless (often wee) hours schlepping me and my borrowed gear around, often risking life, limb, and legality, while I barked orders at them and rolled VHS tape. In my mind, my friends and family were all A-list actors, stunt performers, martial artists, and precision drivers — as well as dolly grips, production assistants, and caterers. And so they became, through and behind my lens. If you can give me credit for one thing in the making of this film, it’s taking greedy, exhaustive advantage of their generosity.

For example, it never crossed my mind that my brother Eric would not want to dress like a ninja and be thrown from a moving car. In fact, he very much did not want to. He said he would get hurt. I told him it would look great. Turned out we were both right.

ninja2.gif

The project hinged completely on one friend in particular: Steve DeCosse (credited as Steve Hershaw). The character of Skate Warrior was his creation; a notebook sketch during algebra class that we couldn’t stop talking about. Skate Warrior was also, of course, Steve himself — a self-created superhero for whom he was the alter-ego.

Steve was my action movie muse. He was a talented skater, which represented a small subset of his fearlessness in all things physical. He had a magnetism and charisma that I cherished as a friend, and knew from experience that I could capture on camera.

steveStand.gif

Steve was the reason Skate Warrior got made. And, tragically, he’s the reason you can see it today.

Steve DeCosse, 1972–2020

Steve circa 1990.

Steve circa 1990.

In May of 2020, Steve passed away unexpectedly. He is survived by his wife and three children. I had not seen him in over 17 years. It’s clear that his generosity and joyful spirit affected everyone who knew him the same way it did me.

I miss you buddy.

Speaking of Time Passing: COVID-19

Living under the strange timelessness of lockdown has inspired a lot of projects in my household, including a noble attempt by my wife to declutter our basement. Together, as we piled boxes for the dump, we unearthed a massive, beige hard drive enclosure that I suspected might contain the finished cut of Skate Warrior.

The “DataDock” system allowed SCSI drives to be “hot swappable,” an unimaginable luxury in 1997.

The “DataDock” system allowed SCSI drives to be “hot swappable,” an unimaginable luxury in 1997.

Me at CalArts in 1991. Traded in a gold for the platinum Bolex.

Learning to Cut

At CalArts, I made a couple of “real” films, shot and edited on 16mm film. But I and my cohort of filmmaking buddies rapidly gravitated to the immediacy and cost-effectiveness of making movies on tape. It’s almost impossible today to recall just how unthinkable this was back then. “Video” was a dirty word. But we were not trying to make beautiful films. We were trying to learn filmmaking, and we wanted to make our mistakes fast.

I tell people making DV movies at home, use it for practice. Don’t even try to get it distributed unless it’s fucking fantastic. If not, just keep cranking them out. Get better; get better at storytelling. It allows you to do what I did when I started out, which is make a ton of movies for nothing. And you get so much better at it after a while, you can write them and direct them and you know the structure. You just need to learn how to do it and you learn by doing.
— Robert Rodriguez in a 2013 Moviemaker interview

We would shoot on Hi-8, and edit in a linear tape-to-tape suite where it was nearly impossible to go back and correct mistakes. The only visual effects we could manage were either in-camera, or superimposed with by-hand sync via a genlocked Amiga 500 running Deluxe Paint III. This was the post methodology that I planned to use on Skate Warrior. But I never got around to the monumental task of editing over eight hours of footage into a finished film, so those camera originals traveled with me to the start of my film-industry career and adult life: my life-long dream job at Industrial Light & Magic.

There, as I learned the ways of the VFX pipeline created for Jurassic Park, I decided to take advantage of a friend’s access to ILM’s editorial AVID systems and learn non-linear editing as well. Forest Key, who would go on to co-found Puffin Designs and create the seminal Commotion rotoscoping software with ILM veteran Scott Squires, taught me the basics of editing on a computer, and the footage I digitized for practice was from those Skate Warrior tapes — which were already five years old.

The handguns of Skate Warrior were battery-powered toys from Laramie, the company that created Super Soakers. Pulling the trigger would cause the slide to ratchet in a photogenic way that I thought was essential to our plan, as I had no ability to digitally manipulate footage at the time. We sanded off the branding and spray-painted them silver and black. Batteries added weight, so we kept them in, meaning the actors were treated to a tinny gunfire sound effect when they fired.

Keeping VHS tapes in a cardboard box for five years, dragging them across the country from Minnesota to LA to Northern California — often in checked luggage or the back of a pickup truck — is not exactly a recipe for improving the already questionable image quality of half-inch magnetic tape. The footage looked just plain awful. As my AVID practice sessions morphed into long, late nights cutting the entirety of Skate Warrior, I was constantly questioning whether the effort was warranted. We were kids when we shot it, and it showed. This was going to be a terrible film.

If I had finished Skate Warrior in college, on tape, with the incredibly limited post tools available to me at the time, it would have been an impressive, “how the hell did you do that” accomplishment. Years later, lavishing this sophomoric albatross with the same VFX resources I was using on a Star Wars movie was only going to make people ask, “Why the hell did you do that?”

But the busier I am with my day job, the more intensely I pursue my side interests — and I was very busy indeed in those days. So during breaks from animating Naboo Starfighters, I picked away at the over 130 Skate Warrior VFX shots, using ElectricImage and After Effects, between 1997 and 1999.

I kept all the files on that single 5GB hard drive.

And Then I Was... Done?

In 1999, I “finished” the film, including a better score than it deserved by Mike Berkley, and sound design by Last Birthday Card composer David Levison. I somehow secured permission to use two songs from a ska band, because it was the ’90s. I even shot the “skate sequence” that I always envisioned for the opening of the film, in San Francisco, using my brand-new VX1000 DV camera.

Skate Warrior was done. I was about ready to render it.

And then I left ILM, and took my 5GB drive with me.

And put it in a box for 20 years.

Benjamin Warde, AKA my friend who owned a suit, as Agent Warde. Ben and I met in first grade, where we caused so much trouble together that our teacher made sure we were never in the same class for the rest of grade school.

Alex Bajuniemi as the sinister Lex with the dopest Jeep CJ7. Alex also supplied the VHS camera, the MG, the creepy basement, and occasional Swedish pancake breakfasts.

Bob Jens as “Bob.” Sadly Bob is also no longer with us — he died in a small aircraft crash around the time I was editing the film. Bob’s mottled-green Pontiac was affectionately known as “The Toad.”

Eric Bajuniemi, the one cast member who actually knew martial arts, as a henchman presumably named Eric. Gosh there sure are a lot of guns in this film.

Eric Maschwitz as the Ninja(s) who wear Chuck Taylors. Eric was and is a skilled fabricator, so he built most of the custom props for the film. Which were all guns.

Molly Feigal as Mol. The only experienced actor in the film, Molly provided me numerous opportunities to have no idea what to do with a female character.


One ⌘R in 1999 Could Have Saved Me a Lot of Trouble in 2020

I honestly can’t remember why I never rendered the final movie. I mastered it in After Effects 3.1, including some basic color corrections and all of the VFX shots, and as near as I can tell, that project was done, or in that awful, precarious state of 99% done. Why did I never just press ⌘R and render a final-ish version?

One plausible reason is that this render would have taken days — and back then, a beige Mac rendering After Effects was unavailable for any other tasks. Like making Star Wars.

The de-archived files as they appeared on my Mac in 1999. I apologize that I am obviously the reason Apple no longer allows visual customization of their desktop operating system.

Surely the primary reason though is the hardest to comprehend today: there would be little point in rendering the entire film back then, because there would be no way to play it back. That’s right, in 1999, specialty hardware was required to play back SD video. But I actually had that hardware: a Radius DV card. I should have left ILM with a copy of Skate Warrior on DV tape. But I did not.

Instead I left with it in pieces. A locked cut with no VFX shots, and series of dated folders full of poorly-named VFX renders, and one massive After Effects project that synced them all up.

These files are all from Mac OS 9, so they lack file extensions and other useful metadata. And many of them are in obsolete QuickTime codecs, including the two largest files that contained the locked edit as output from the Avid.

All of these superannuated files were locked on this grime-encrusted, decades-old hard drive, behind a 30-pin SCSI connector the size of a granola bar.

Imagine how many adapters it would take to attach this to a modern Mac.

Data Recovery

As time sailed on, the likelihood that I could find a functioning computer with a SCSI connector dwindled to zero. But after Steve’s passing, somehow the obvious alternative occurred to me — I could take the drive to a data recovery center. So that’s what I did, and they dissembled it right in front of me and looked up the serial number of the gigantic brick of a 5GB platter. “This was a very expensive drive when it was new.”

They easily recovered the data and emailed me a link a few days later. It took ten seconds to download. Nearly all of the QuickTime movie files were there.

And almost none of them would open on any computer I had access to.

Including the two main Avid output files — the reasons I’d gone to all this trouble. They would only display black pixels, no matter what I tried.

The Avid files would open in QuickTime Player 7, but would only show black.

QuickTime 7 would open some of the VFX shots, but not all. Good thing I hadn’t updated to macOS Catalina yet.

Digital Archeology

Skate Warrior was not quite done soaking up the generosity of those around me. I reached out to my wonderful community of fellow nerdy filmmakers, and eventually accepted an irrationally kind offer by Juan Salvo to help decode the footage. He was able to replace the header information in the QuickTime movies with something that would make them readable, and convert them to ProRes.

Now I had the finished cut and all of the individual VFX shots, and a 21-year-old After Effects project that held the key to realigning them. Here’s what that project looked like, running on my Mac in 1999:

I don’t miss this timeline window 1 bit.

After Effects 2020 will not open an AEP from before AEPs were called AEPs, but luckily for me, I have a friend who keeps a functioning museum of every version of After Effects that ever existed, because he was one of the original team that created CoSA After Effects 1.0. I sent him the project, and he sent me back a version I could open.

Then I proceeded to re-do most of the conforming work anyway, because I’m too lazy to do a small amount of boring work instead of a ton of mildly interesting work.

Remastering Skate Warrior in After Effects 2020.

Remastering Skate Warrior in After Effects 2020.

So at long last, in July of 2020, I rendered the final version of Skate Warrior.

And here it is.

I’m sure you set out to make a good film. But what you wound up with is so much better than if you’d succeeded.
— Benjamin Warde (Agent Warde)
 

You Should Not Watch This Movie.

Serioulsy, spare yourself. It’s bad. It’s boring, the dialogue is awful, and the plot makes not one lick of sense. It looks like a dog’s breakfast.

But it also contains the germ of many an idea that I still use in my filmmaking today. It was, along with The Last Birthday Card, the object model of The DV Rebel’s Guide. And there are a few good tricks in it.

car2jeep.gif

It contains this amazing stunt, which we never should have attempted. Please do not try this at home. These are not trained professionals.

jeep2car.gif

There’s also this mirror of that stunt, where Steve is “thrown” from the Jeep back to the car. At half-speed you can see the simple anatomy of the moment: An implausible pantomime of a throw, and a real and ill-advised stunt where Steve jumped from outside the roll bar of the CJ7, surprising me with a little slide across the hood for flair. Bridging the two shots is an insert of Steve leaping from the back seat, which we performed with the Jeep safely stationary. Someone did the job on the day of rocking the Jeep to give the shot life, and I added a digital streetlight blurring past in the background to sell the illusion of motion. Feel free to borrow this trick as often as you like, George Miller.

elevator.gif

The important shot I forgot to rip off.

Skate Warrior is full of “homages” to my then-favorite films, executed in that juvenile way that young filmmakers do, where they just mimic the scene without any insight, satire, or commentary. We humorlessly duplicated the violent gun shop scene from Terminator, and also shot-for-shot copied the moment in Die Hard where McClane is nearly crushed by the elevator. To film this, we inadvisably climbed on top of an actual moving elevator (in a location that not only did we not have permission to shoot in, but that we’d actually broken into). To make it look like the mechanism was anywhere near in danger of crushing Steve, I had to stand up from a crouch as I tilted the camera up, to add extra travel and get the metal block closer to the lens. Then, in the next shot, I added a glimpse of the mechanism in post. Being incompetent, I failed to copy the shot that would have actually sold this gag: Steve looking up at the camera pushing down on him, realizing he was in danger. Oops.

There’s a lot of double-cutting in this clip, inspired by studying Jackie Chan films.

There’s a lot of double-cutting in this clip, inspired by studying Jackie Chan films.

Another fun trick was this fight-on-a-high-ledge moment from the “climax” of the film. We shot this on an easily-accessible part of Northrop Auditorium in Minneapolis, where the ledge was only five or six feet off the ground. But for this moment of Steve’s legs dangling over a much higher drop, we relocated to the back of the building (which required Steve and Eric to shimmy around the entire building on said ledge).

I shot a POV of the drop years later in San Rafael, and digitally added Eric’s dropped weapon.

Colie Wertz, whom you might now know as a brilliant concept artist, doubling Eric for the fall. My plan was to stabilize out his vertical jump, which worked. What didn’t work was that Colie should have been wearing a white shirt to match Eric’s.

Dan Goldman, then R&D TD at ILM, now Giant Pulsing Brain at Adobe, doubling Steve’s silhouette for the final VFX shot. Everyone’s jeans looked like that back then. It was not a good decade for denim.

Eric’s character falls to his cinematic demise in this same angle, which I achieved by shooting an element of Rebel Mac Unit modeling wiz Colie Wertz jumping in place in front of a bluescreen that had been left standing in the ILM parking lot after an element shoot.

When the pickup drives over Eric, that’s me driving my Mazda over a curb, which I painted out.

When the pickup drives over Eric, that’s me driving my Mazda over a curb, which I painted out.

Lex fires the battery gun, with digitally-added muzzle flashes and shells as described in the DV Rebel’s Guide. The smoke in the final shot is practical, from a different toy gun that fired old-fashioned paper caps.

The skateboard was a hand-built miniature, which I mounted to a metal plate and pelted with a CO2 BB gun. Sit back there and say my hair ain’t luxurious.

We didn’t have a car mount, and didn’t think to improvise one. So any time you see a shot like this, it’s me riding on the hood, like an idiot.

Our version of “zirc hits” were illegal firecrackers that were frustratingly unpredictable. This one nearly deafened Ben, another one almost got us arrested.

To create these practical bullet hits, I fired BBs at the ground behind Steve and Ben. Ben did not like this idea, because he was afraid the BBs would ricochet off the ground and hit him. I told him it would look great. Turned out we were both right.

I slowed down Steve’s leap over the car (which he really did, effortlessly) and left Ben’s tumble real-time, to give Steve’s movement more of an anime-inspired timing.

Never imagining I’d have something like After Effects to help me assemble this film, I locked off the camera and added foil bullet hits to the car one at a time, thinking I’d rapidly edit them together. Using video tape. Like an animal.

The biggest effects moment in the film is where Skate Warrior’s skateboard transforms into a sword, as foretold in Steve’s high school notebook drawing and a ponderous flashback scene in the film. I modeled the skateboard and sword in Lightwave 3D and animated them in ElectricImage. I hand-animated the sparks in Commotion.

The other big VFX beat is when a hand-grenade blows up Bob’s car. This was a combination of a live-action plate and a Pyromania element from a CD-ROM.

My pre-digital plan for the car explosion was to blow up a miniature, which I actually did shoot on Super 8 film. I’ll let you know if I ever find that footage.

For the reverse of the explosion, we lit a piece of Bob’s car on fire and dropped it off a bridge. This is a true statement.

All of this and more I discuss in the most unrequested of all behind-the-scenes materials ever created: that’s right, the Skate Warrior Director’s Commentary:

Please also feel free to very much not watch this.


The Good Kind of Nostalgia?

There are too many names listed under “in memory of” at the end of this film. The song I chose for the credits, “Friend” by the Stubborn All-Stars, says “Those who live on, and those who may have passed; You’ve taught me one thing well: that nothing ever lasts.”

But I’m lucky enough to disagree. This crazy, stupid film exists. And so do an improbable number of the friendships that I abused to make it. Over the past 28 years, we’ve attended each other’s weddings, held each other’s babies, and mourned together as time took its toll.

As I grow older, I’m wary of the seductive alure of nostalgia. Looking back seems the opposite of moving forward. But in 2020, moving forward seems to take us into darker and darker places, so as a part of my ongoing commitment to questionable self-care, and inspired by a suggestion that Steve’s friends and family might like to see the cellar-aged fruits of our youthful labors, I allowed myself the indulgence of restoring this time capsule of my life and friendships from a formative period.

I’m thoroughly embarrassed by this film, and also immensely proud of it.

But mainly I’m just grateful to every single person who contributed to it.

Sorry it took so long to press ⌘R.

In 2009 I was reunited with the Bajuniemi family’s VHS camcorder that we used to film Skate Warrior. Photo by Alex Bajuniemi.