
When AE7 was announced, I posted a list of ten cool things you can do with it. Let's dive right in to one of the biggest, which is that you can scrap eLin and work in a true linear floating point color space.
Warning: The following may have the effect of making AE7's 32-bit float mode sound more complicated than it inherently is, so let me stress that none of what I describe here is strictly necessary for enjoying AE7's new color mode. If you want to experiment with the increased quality and overbright performance of float, just pop your project into float mode and start experimenting. But if you've warmed up to a linear color workflow, perhaps via eLin or similar techniques, then read on for the AE7 equivalents.
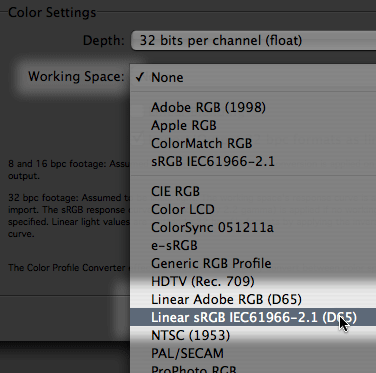
The first thing you'll note about AE7's Project Settings dialog is that it has grown substantially. There's now a pop-up for your Project Working Space. This is a the first baby steps of ICC color management in AE. It's not a complete implementation in 7.0, but it is usable, and it's perhaps the easiest way of working in a linear color space.

What you're going to do is select
32 bits per channel (float)
, and then select a linear color profile as your Project Working Space. The problem is that no linear, or gamma 1.0 profiles ship with AE7. So quit AE and download this file:
linearProfiles.zip (4kb zip file)
Unzip it and add the two files contained within to your collection of ICC profiles. On the Mac, that's:
~/Library/ColorSync/Profiles/
On Windows, it's:
C:\Program Files\Common Files\Adobe\Color\Profiles
Restart After Effects, create a new project, and access the Project Settings Window. Select 32bpc mode, and then select one of these two linear profiles as your Project Working Space.
How do you choose between them? Good question, one that entire books have been written to address for the Photoshop community that's been dealing with the joys and pains of ICC color management since before we had RAM preview. You could do worse than to go read two or three of those books right now. If, afterwards, you still have the will to live, pick one of the two profiles at random and plow ahead.
You now have a floating-point project with a linear Working Space. Import a familiar image, preferably one with an ICC profile embedded. Add it to a comp and view the result.
The image will look too bright. Why? Well, AE doesn't recognize the embedded profile. That's right, here's where AE's fledgeling color management leaves us hanging. AE is assuming that the imported footage is already in the Project Working Space. It's not. It's gamma-encoded, so it looks too bright. We have to manually convert the gamma-encoded colors in our image to the linear Project Working Space.
We do this with Effect > Utility > Color Profile Converter. Apply this effect to your image and observe the Effects Controls. You'll see pop-ups for two profiles, Input and Output. The idea here is that we convert the pixels from the image's native color space to that of the project. So set Input Profile to the correct profile for the image, the one embedded within it. Leave Output set to Project Working Space.

Now the image in the comp viewer should look correct. You've converted your pixels to linear light values and your linear image is not only being gamma corrected for display, it's also being display compensated using ICC color management. In other words, for the first time ever, and whether you like it or not, this image will look the same in After Effects as in Photoshop.
There's much more to discuss, but we had to start somewhere. Please comment, query, cry, or acquiesce.